Garmin Catalyst Driving Performance Optimizer Owners Manual - Page 6
Installing the Remote Cam on Your, Windshield, Connecting the Camera Cable
 |
View all Garmin Catalyst Driving Performance Optimizer manuals
Add to My Manuals
Save this manual to your list of manuals |
Page 6 highlights
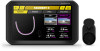
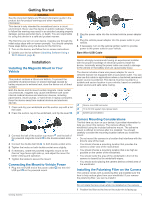
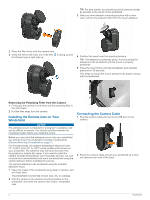
TIP: For best results, you should mount the camera as high as possible in the center of the windshield. 3 After you have selected a mounting location with a clear view, remove the protective film from the mount adhesive. 2 Place the filter firmly onto the camera lens. 3 Verify the line on the outer rim of the filter is facing up and the Garmin logo is right side up. 4 Position the mount over the mounting location. TIP: The adhesive is extremely sticky. Avoid touching the adhesive to the windshield until the mount is properly positioned. 5 Press the mount firmly onto the windshield, and maintain pressure for 30 seconds. This helps to ensure the mount adhesive has proper contact with the windshield. Removing the Polarizing Filter from the Camera 1 Firmly grip the camera in one hand and the polarizing filter in the other hand. 2 Pull the filter away from the camera. Installing the Remote Cam on Your Windshield NOTICE The adhesive mount is intended for a long-term installation and can be difficult to remove. You should carefully consider the mounting location before you install the mount. Before you can install the adhesive mount onto your windshield, you should review the windshield mounting considerations (Camera Mounting Considerations, page 1). For the best results, the ambient temperature should be from 21° to 38°C (from 70° to 100°F) while installing the camera on your windshield. The adhesive may not bond correctly if the temperature is outside this range. If you need to install the camera at lower temperatures, you must clear all snow, ice, and moisture from the windshield and warm the windshield using the vehicle defroster before installing the camera. The camera attaches to the windshield using the included adhesive mount. 1 Clean the inside of the windshield using water or alcohol, and a lint-free cloth. The windshield must be free of dust, wax, oils, or coatings. 2 Hold the camera in the desired mounting location on the windshield, and verify the camera has a clear, unimpeded view. Connecting the Camera Cable 1 Plug the camera cable into the micro-USB port on the camera. 2 Route the camera cable around your windshield so it does not obstruct your view of the track. 2 Installation
-
 1
1 -
 2
2 -
 3
3 -
 4
4 -
 5
5 -
 6
6 -
 7
7 -
 8
8 -
 9
9 -
 10
10 -
 11
11 -
 12
12 -
13
-
14
-
15
-
16
-
17
-
18
 |
 |
