Garmin GPSMAP 620 Owner's Manual - Page 63
Charging Your GPSMAP 620, Changing the Fuse on the Automotive Mount, Cleaning the Unit
 |
UPC - 749856016963
View all Garmin GPSMAP 620 manuals
Add to My Manuals
Save this manual to your list of manuals |
Page 63 highlights
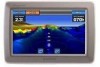
Charging Your GPSMAP 620 • Before using the GPSMAP 620 for the first time, charge the battery for at least six hours. • Place the GPSMAP 620 in either the automotive mounting bracket or the marine mounting bracket with the bracket connected to power. The vehicle or vessel key may need to be turned to ON/ACC for the GPSMAP 620 to charge. • Connect the included AC adapter to the GPSMAP 620 and a wall outlet. Changing the Fuse on the Automotive Mount Caution: When replacing the fuse, do not lose any of the small pieces and ensure they are put back in the proper place. If your unit will not charge in your vehicle, you might need to replace the fuse located at the tip of the vehicle adapter. 1. Unscrew the black, round end piece, and remove it. 2. Remove the fuse (glass and silver cylinder), and replace it with a 1.5 A fast-blow fuse. End piece Silver tip Fuse 3. Ensure that the silver tip is placed in the black end piece. Screw on the black end piece. Appendix Caring for Your GPSMAP 620 Your GPSMAP 620 contains sensitive electronic components that can be permanently damaged if exposed to excessive shock or vibration. To minimize the risk of damage to your GPSMAP 620, avoid dropping your unit and operating it in high-shock and highvibration environments. Cleaning the Unit The GPSMAP 620 is constructed of high-quality materials and does not require user maintenance other than cleaning. Clean the outer casing of the unit (not the touchscreen) using a cloth dampened with a mild detergent solution, and then wipe it dry. Avoid chemical cleaners and solvents that can damage plastic components. Cleaning the Touch Screen Clean the touchscreen with a soft, clean, lint-free cloth. Use water, isopropyl alcohol, or eyeglass cleaner, if needed. Apply the liquid to the cloth, and then gently wipe the touchscreen. GPSMAP 620 Owner's Manual 57
-
 1
1 -
2
-
3
-
4
-
5
-
6
-
7
-
8
-
9
-
10
-
11
-
12
-
13
-
14
-
15
-
16
-
17
-
18
-
19
-
20
-
21
-
22
-
23
-
24
-
25
-
26
-
27
-
28
-
29
-
30
-
31
-
32
-
33
-
34
-
35
-
36
-
37
-
38
-
39
-
40
-
41
-
42
-
43
-
44
-
45
-
46
-
47
-
48
-
49
-
50
-
51
-
52
-
53
-
54
-
55
-
56
-
57
-
 58
58 -
 59
59 -
 60
60 -
 61
61 -
 62
62 -
 63
63 -
 64
64 -
 65
65 -
 66
66 -
 67
67 -
 68
68 -
69
-
70
-
71
-
72
 |
 |
