Gateway M520 User Guide Gateway M520 Notebook - Page 62
Monitoring the battery charge
 |
View all Gateway M520 manuals
Add to My Manuals
Save this manual to your list of manuals |
Page 62 highlights
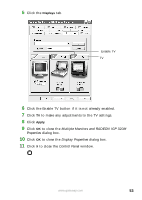
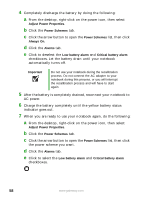
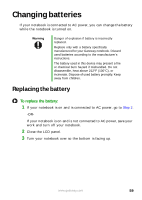
Monitoring the battery charge Your new Gateway notebook is designed to provide an exceptional balance of performance and portability. Your notebook uses the latest chipset and mobile processor technologies to manage the processor speed and power consumption for a greater battery life experience. This design provides you with maximum performance when plugged into AC power balanced with optimized battery life when on battery power. Closely monitor the battery charge. When the battery charge gets low, change the battery or connect to AC power immediately to prevent losing any unsaved work. To monitor the battery charge: ■ Double-click the power cord icon or battery icon in the taskbar. The Power Meter dialog box opens. Important If the power cord or battery icon does not appear on the taskbar, click the show hidden icons button. If the icon still does not appear, make sure that Always show icon on the taskbar is checked on the Power Options Properties Advance tab. For more information, see "Changing advanced settings" in Using Your Computer which has been included on your hard drive. To access this guide, click Start, All Programs, then click Gateway Documentation. ■ Look at the battery charge indicator: ■ LED off - battery is fully charged. ■ LED on - battery is charging. ■ LED blinking - battery charge is very low. Important This LED only lights up when the notebook is connected to AC power. For the location of the battery charge indicator, see "Front" on page 10. ■ Wait for a Low Battery warning message to appear. 56 www.gateway.com
-
 1
1 -
2
-
3
-
4
-
5
-
6
-
7
-
8
-
9
-
10
-
11
-
12
-
13
-
14
-
15
-
16
-
17
-
18
-
19
-
20
-
21
-
22
-
23
-
24
-
25
-
26
-
27
-
28
-
29
-
30
-
31
-
32
-
33
-
34
-
35
-
36
-
37
-
38
-
39
-
40
-
41
-
42
-
43
-
44
-
45
-
46
-
47
-
48
-
49
-
50
-
51
-
52
-
53
-
54
-
55
-
56
-
 57
57 -
 58
58 -
 59
59 -
 60
60 -
 61
61 -
 62
62 -
 63
63 -
 64
64 -
 65
65 -
 66
66 -
 67
67 -
68
-
69
-
70
-
71
-
72
-
73
-
74
-
75
-
76
-
77
-
78
-
79
-
80
-
81
-
82
-
83
-
84
-
85
-
86
-
87
-
88
-
89
-
90
-
91
-
92
-
93
-
94
-
95
-
96
-
97
-
98
-
99
-
100
-
101
-
102
-
103
-
104
-
105
-
106
-
107
-
108
-
109
-
110
-
111
-
112
-
113
-
114
-
115
-
116
-
117
-
118
-
119
-
120
-
121
-
122
-
123
-
124
-
125
-
126
-
127
-
128
-
129
-
130
-
131
-
132
-
133
-
134
-
135
-
136
-
137
-
138
-
139
-
140
-
141
-
142
-
143
-
144
-
145
-
146
-
147
-
148
-
149
-
150
-
151
-
152
-
153
-
154
-
155
-
156
-
157
-
158
-
159
-
160
-
161
-
162
-
163
-
164
-
165
-
166
-
167
-
168
 |
 |
