Gateway M520 User Guide Gateway M520 Notebook - Page 77
Step 13, Insert the battery and turn your notebook over. - driver
 |
View all Gateway M520 manuals
Add to My Manuals
Save this manual to your list of manuals |
Page 77 highlights
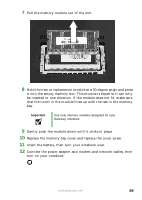
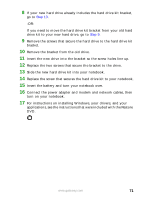
8 If your new hard drive already includes the hard drive kit bracket, go to Step 13. -OR- If you need to move the hard drive kit bracket from your old hard drive kit to your new hard drive, go to Step 9. 9 Remove the screws that secure the hard drive to the hard drive kit bracket. 10 Remove the bracket from the old drive. 11 Insert the new drive into the bracket so the screw holes line up. 12 Replace the two screws that secure the bracket to the drive. 13 Slide the new hard drive kit into your notebook. 14 Replace the screw that secures the hard drive kit to your notebook. 15 Insert the battery and turn your notebook over. 16 Connect the power adapter and modem and network cables, then turn on your notebook. 17 For instructions on installing Windows, your drivers, and your applications, see the instructions that were included with the Restore DVD. www.gateway.com 71
-
 1
1 -
2
-
3
-
4
-
5
-
6
-
7
-
8
-
9
-
10
-
11
-
12
-
13
-
14
-
15
-
16
-
17
-
18
-
19
-
20
-
21
-
22
-
23
-
24
-
25
-
26
-
27
-
28
-
29
-
30
-
31
-
32
-
33
-
34
-
35
-
36
-
37
-
38
-
39
-
40
-
41
-
42
-
43
-
44
-
45
-
46
-
47
-
48
-
49
-
50
-
51
-
52
-
53
-
54
-
55
-
56
-
57
-
58
-
59
-
60
-
61
-
62
-
63
-
64
-
65
-
66
-
67
-
68
-
69
-
70
-
71
-
 72
72 -
 73
73 -
 74
74 -
 75
75 -
 76
76 -
 77
77 -
 78
78 -
 79
79 -
 80
80 -
 81
81 -
 82
82 -
83
-
84
-
85
-
86
-
87
-
88
-
89
-
90
-
91
-
92
-
93
-
94
-
95
-
96
-
97
-
98
-
99
-
100
-
101
-
102
-
103
-
104
-
105
-
106
-
107
-
108
-
109
-
110
-
111
-
112
-
113
-
114
-
115
-
116
-
117
-
118
-
119
-
120
-
121
-
122
-
123
-
124
-
125
-
126
-
127
-
128
-
129
-
130
-
131
-
132
-
133
-
134
-
135
-
136
-
137
-
138
-
139
-
140
-
141
-
142
-
143
-
144
-
145
-
146
-
147
-
148
-
149
-
150
-
151
-
152
-
153
-
154
-
155
-
156
-
157
-
158
-
159
-
160
-
161
-
162
-
163
-
164
-
165
-
166
-
167
-
168
 |
 |