GE AZ41E12DAB Owners Manual - Page 6
Freeze Sentinel/Heat Sentinel
 |
View all GE AZ41E12DAB manuals
Add to My Manuals
Save this manual to your list of manuals |
Page 6 highlights
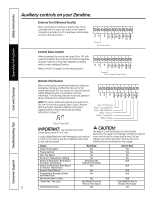
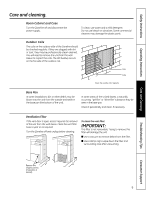
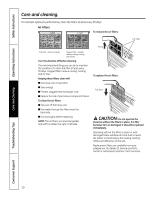
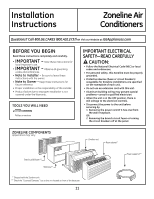
Consumer Support Troubleshooting Tips Care and Cleaning Operating Instructions Safety Instructions Auxiliary controls on your Zoneline. MODE 3 Freeze Sentinel/Heat Sentinel In the default setting for Mode 3, Heat Sentinel is off, Freeze Sentinel is on. Press MODE until a 3 appears in the first digit of the display for Freeze Sentinel mode. The COOL LED light on the main control will be on. Press MODE again to change to the Heat Sentinel. The HEAT LED light on the main control will be on. Press the down arrow for OFF " " or the up arrow for ON " ." This is shown in the second digit of the display. Press AUX SET to confirm your selection and exit AUX SET mode, or press MODE to continue setting other functions. When Freeze Sentinel is activated, it automatically provides heat without user interface. This helps to prevent plumbing damage by turning the heater and indoor fan ON at 41ºF and OFF at 46ºF. When Heat Sentinel is activated, it automatically provides cooling without user interface. This helps to prevent an excessively hot room by turning the air conditioner ON at 85ºF and OFF at 80ºF. NOTE: These functions are active whenever the unit is plugged in, even if the unit is in the STOP position. MODE 4 Constant ON Fan The default setting for Mode 4 is OFF. Press MODE until a 4 appears in the first digit of the display to set the fan to run continuously at high speed, even if the unit is in the STOP position. Press the down arrow for OFF " " or the up arrow for ON " ." This is shown in the second digit of the display. Press AUX SET to confirm your selection and exit AUX SET mode, or press MODE to continue setting other functions. MODE 5 Temperature Limiting The default setting for Mode 5 is as follows: Cool: 0 (60ºF to 85ºF) Heat: 7 (60ºF to 85ºF) Press MODE until a 5 appears in the first digit of the display for Temperature Limiting cool mode. The COOL LED light on the main control will be lit. To change to heat mode, press MODE again and the HEAT LED light on the main control will be lit. To set the temperature limits, press the up or down arrow keys. The second digit of the display will be between 0 and 7 depending on the limit you want to set. The chart shows the limits available. Press AUX SET to confirm your selection and exit AUX SET mode, or press MODE to continue setting other functions. Temperature limits-Cool 0 = 60°F to 85°F 1 = 64°F to 85°F 2 = 66°F to 85°F 3 = 68°F to 85°F 4 = 70°F to 85°F 5 = 72°F to 85°F 6 = 74°F to 85°F 7 = 76°F to 85°F Temperature limits-Heat 0 = 60°F to 65°F 1 = 60°F to 70°F 2 = 60°F to 72°F 3 = 60°F to 74°F 4 = 60°F to 76°F 5 = 60°F to 78°F 6 = 60°F to 80°F 7 = 60°F to 85°F MODE 6 Remote Thermostat - Class 2 The default setting for Mode 6 is OFF. Setting this mode to ON will allow the unit to operate with a Class 2 Remote Control Wall Thermostat. Press MODE until a 6 appears in the first digit of the display for Class 2 mode. Press the down arrow to turn the option OFF " ." Press the up arrow to turn this option ON " ." This is shown in the second digit of the display. 6 Press AUX SET to confirm your selection and exit AUX SET mode, or press MODE to continue setting other functions. HIGH LOW AUTO Freeze Sentinel OFF HIGH LOW AUTO Freeze Sentinel ON HIGH LOW AUTO Heat Sentinel OFF HIGH LOW AUTO Heat Sentinel ON COOL FAN HEAT COOL FAN HEAT COOL FAN HEAT COOL FAN HEAT Constant Fan OFF Constant Fan ON HIGH COOL LOW FAN AUTO HEAT Temperature Limiting Cool - Limit 2 HIGH COOL LOW FAN AUTO HEAT Temperature Limiting Heat - Limit 3 Class 2 OFF Class 2 ON
-
 1
1 -
 2
2 -
 3
3 -
 4
4 -
 5
5 -
 6
6 -
 7
7 -
 8
8 -
 9
9 -
 10
10 -
 11
11 -
 12
12 -
13
-
14
-
15
-
16
-
17
-
18
-
19
-
20
-
21
-
22
-
23
-
24
-
25
-
26
-
27
-
28
-
29
-
30
-
31
-
32
-
33
-
34
-
35
-
36
-
37
-
38
-
39
-
40
-
41
-
42
-
43
-
44
-
45
-
46
-
47
-
48
-
49
-
50
-
51
-
52
-
53
-
54
-
55
-
56
-
57
-
58
-
59
-
60
-
61
-
62
-
63
-
64
-
65
-
66
-
67
-
68
-
69
-
70
-
71
-
72
 |
 |
