Genie ProMax Stealth Owner's Manual - Page 13
Genie ProMax Stealth Manual
 |
View all Genie ProMax Stealth manuals
Add to My Manuals
Save this manual to your list of manuals |
Page 13 highlights
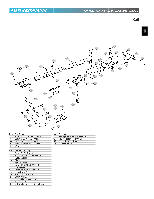
CAUTION Header bracket must be fastened to garage fbroaamrdin,gp.laDsoteNrootrfaosthteenr stoucdhrymwaatlel,rpiaalsrt.icle Line "V" "B" "A" Header Bracket 3. Install header bracket (Fig. 2-3) Line "H" • Place bracket so: - center hole is on line "V." 13 - all holes are on line "H." • Mark hole positions "A" and "B." • Drill 5/32" holes at marked positions. • Flaagstsecnrebwrasc[k7e9t].to header using two (2) 1/4" x 2" CVoefenrDtetiorcloainrle Lag Screws [79] 4. Attach channel/rail assembly to header Fig. 2-3 bracket (Fig. 2-4). • • IFHnaessatatdellensrhpbeeraaedcdkenerutetwn[id8th1o]cf.othldehcehaadnenrepl/irnai[l8t2o].the T-rail shown. Channel attachment is same. • Support power head above floor, use: - rope. - ladder with cardboard packing. - wood. [82] 5. Level rail assembly and power head (Fig. 2-5). • Raise and support power head above door tracks. • Open door. • Level channel/rail assembly and HBreaacdkeert Sp[e8e1d n]ut Cold phineader support temporarily. • Center channel/rail assembly and power head on line "V" of door. NshmheOooaTvduiEnlmd:gTabdhyeoebloecervhmemalnuoinfsueptnlont/ersoadstilitlbooalwusecs.eheIrf.mcnHhbeoalcywneaensnvseedal/rrrpaymoi,lwpoaoueswnrsteehemreda,bdly. Spring Header CAUTION pMfrlaaomsutnientrgino.gDr boortahNceokretstfuamcshtuesmnt abtoteedrfiarayslwste.anlle,dpatortigcalerabgoeard, 6. Mount power head (See Section 2 MOUNTING METHODS). • Be sure channel/rail assembly and power head are on door center line (Line "V"). • Check the illustrations. Decide which mounting method you will use. Materials for mounting are not included. • After power head is installed, remove supporting material. • Close door. 7. Install door braces (See CAUTION below). Door nceSlecuaeprspssoaprrrtyiniftgo Fig. 2-4 Power Head CAUTION Doors made of masonite, lightweight wood, fiberglass, and metal must be properly braced before mounting Door Operator. Contact door manufacturer or distributor for bracing instructions. CAshsaenmnebll/yRail Center Line Fig. 2-5
-
 1
1 -
2
-
3
-
4
-
5
-
6
-
7
-
 8
8 -
 9
9 -
 10
10 -
 11
11 -
 12
12 -
 13
13 -
 14
14 -
 15
15 -
 16
16 -
 17
17 -
 18
18 -
19
-
20
-
21
-
22
-
23
-
24
-
25
-
26
-
27
-
28
-
29
-
30
-
31
-
32
 |
 |
