Genie ProMax Stealth Owner's Manual - Page 19
Safe-T-Beam, Alignment Check
 |
View all Genie ProMax Stealth manuals
Add to My Manuals
Save this manual to your list of manuals |
Page 19 highlights
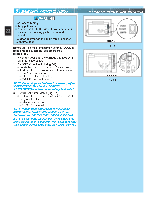
CAUTION Staples whic to stop wor When using the insulated 2 staples, ou fasten them only as tightly ugly. • Make wire attachments at STB's. 3 19 - Splitting and stripping wire ends connected as shown (Fig. 3-6). to be - Loosen terminal screws. FIG. 3-6 FIG. 3-7 Splitting and AttaatcShmTBe.nts FIG. 3-8 (ProMax) Apttoachments at . - Insert wire under flat plate and tighten screw. It does not matter which wire, white or striped, goes on which terminal (Fig. 3-7). • Make wire attachments at power head. - #2 oMax. and #3 on STB's power ahreeacdo(nFniegc.t3e-d8)t.o terminals top5e"d-g6e"oafbleonves bfleotowr.een - . STB's are connected to terminals #3 and #4 on power head (Fig. 3-8). 4. Check the following. • Insure that no part of door or its hardware is in 3 4 path between lenses of source and sensor. • Insure above tthheatfltoooprs(oFfigle.n3s-9e)s. are between 5"-6" The brackets are flexible and can be adjusted slightly if needed. FIG. 3-8 (Stealth) Apttoachments at . NOTE: STB alignment check must be performed following connection to electrical power (see page 21). DO NOT PLUG IN YET! FIG. 3-9 Check lens height. Safe-T-Beam® Alignment Check After turning the electrical power on, if the STB's are not in proper alignment, the red LED (Source) will blink continuously. To correct the problem - the brackets are flexible and can be adjusted slightly to bring the system into alignment. When the STB's are in alignment the red LED will stop blinking and stay on. STB SELF-DIAGNOSTIC TROUBLESHOOTING SOURCE (RED LED) SENSOR (GREEN LED) INDICATED CONDITION REQUIRED ACTION ON ON NORMAL OPERATION NONE REQUIRED OFF OFF 1.POWER HEAD NOT POWERED 2.WIRING FROM POWER HEAD BAD 1.CHECK BREAKERS, FUSES, PLUGS 2.CHECK WIRING FOR OBVIOUS SHORTS OFF ON 1.WIRING TO SOURCE MISSING OR BAD 2.POWER HAS BEEN INTERRUPTED 1.CHECK WIRING 2.REMOVE POWER AND REAPPLY 2 BLINKS, PAUSE (REPEAT) ON 1.BEAM NOT ALIGNED 2. BEAM OBSTRUCTED 3.SENSOR DEFECTIVE 1.CHECK ALIGNMENT 2. CHECK FOR OBSTRUCTION 3.CALL CUSTOMER SERVICE 2 BLINKS, PAUSE (REPEAT) OFF 1.WIRE TO SENSOR MISSING OR BAD 2.SENSOR DEFECTIVE 1.CHECK WIRING 2.CALL CUSTOMER SERVICE 3 BLINKS, PAUSE (REPEAT) ON 1.SENSOR RECEIVING INTERFERENCE 1.ATTEMPT TO DETERMINE SOURCE OF INTERFERENCE 2.CALL CUSTOMER SERVICE 4 BLINKS, PAUSE (REPEAT) ON 1.SOURCE NOT SENDING PULSES 2.SOURCE DEFECTIVE 1.CALL CUSTOMER SERVICE 2.CALL CUSTOMER SERVICE NDOOTWEN: IUFNOTPILERDAOTOINRGISPCRLOOBSLEEDM. E(RXEISMTOST,ETHCEODNOTROORLC&AWN IBREELCELSOSSKEEDYIFPAYDOUW:ILL1.NDOISTCWOONRNKECWTITTHHOEUSTTSBTSBY)STEM FROM THE OPERATOR AND 2. HOLD WALL CONTROL BUTTON CUSTOMER SERVICE: 1.800.354.3643 or www.geniecompany.com
-
 1
1 -
2
-
3
-
4
-
5
-
6
-
7
-
8
-
9
-
10
-
11
-
12
-
13
-
 14
14 -
 15
15 -
 16
16 -
 17
17 -
 18
18 -
 19
19 -
 20
20 -
 21
21 -
 22
22 -
 23
23 -
 24
24 -
25
-
26
-
27
-
28
-
29
-
30
-
31
-
32
 |
 |
