Genie ProMax Stealth Owner's Manual - Page 21
Genie ProMax Stealth Manual
 |
View all Genie ProMax Stealth manuals
Add to My Manuals
Save this manual to your list of manuals |
Page 21 highlights
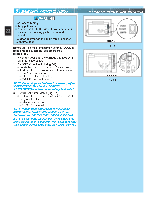
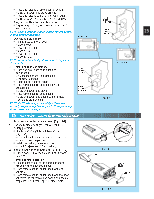
5... CONNECT OPERATOR TO POWER FOR HELP-1.800.354.3643 OR GENIECOMPANY.COM WARNING To reduce the risk of electrical shock, this equipment has a grounding type plug that has a third (tygproeuonudtilnegt.)Ipf itnh.eTphliusgpdluogews inllootnfiltyinfittointthoeaogurtoleut,nding Groouutnledted 21 contact a qualified electrician to install the proper outlet. Do Not change the plug in any way. The door pOowpeerractoorrd operator must be properly grounded to prevent personal injury and damage to the components. The ELECTRICAL POWER to the door operator MUST BE TURNED OFF when power head cover is removed. Electrical power must remain off while mak- Fig. 5-1 ing electrical connections. 1. Check local building codes. • p(SbFrlouaigmgn.ced6hob-1ocu)irir.lcdouipnietg.rIacftooddrireeinscttorewgqirruoiniurgendidseirNdecOotuTwtlriereitqnugirteoda, 2. aRleigtunrmnetnotSaencdtitornou3bfloesrhSoAoFtEin-gT.-BEAM® System NpdroOooTfreEso:spIifeorpnaeatrolmre.alencetnritcwiainriningsitsalrl ecqiruciureitda, nhdavweirae PERMANENT WIRING INSTRUCTIONS FOR ELECTRICIAN 1. Dciirsccuoitnmneacint sth.e power cord from the branch 2. Remove bottom cover from power head. • Remove four (4) hex head screws from front and rear covers. • Slide bottom cover off. 3. Remove existing power cord from power head. • Disconnect three power cord wires. • Remove and discard power cord. • Remove 7/8" diameter knock-out plug. • Install a suitable entrance bushing. 4. Install permanent wiring to power head. For Stealth-connect permanent wiring to internal terminal block. • Connect white supply line to silver terminal. • Connect black supply line to brass terminal. • Connect ground wire to green wire location (GROUND). For ProMax-connect permanent wiring. • Make connections with UL recognized wire nuts. • Connect white supply line to white wire. • Connect black supply line to black wire. • Connect ground wire to green wire location (GROUND). • Wires inside operator are to be a minimum of 6 inches. 5. Replace power head bottom cover. • Replace and tighten four (4) hex head screws. NcoOvTeEr:isCoirncupitobwoearrhdesaadrebelifgohrtesoepnesritaivtieo.nM. ake sure
-
 1
1 -
2
-
3
-
4
-
5
-
6
-
7
-
8
-
9
-
10
-
11
-
12
-
13
-
14
-
15
-
 16
16 -
 17
17 -
 18
18 -
 19
19 -
 20
20 -
 21
21 -
 22
22 -
 23
23 -
 24
24 -
 25
25 -
 26
26 -
27
-
28
-
29
-
30
-
31
-
32
 |
 |
