Genie ProMax Stealth Owner's Manual - Page 14
Genie ProMax Stealth Manual
 |
View all Genie ProMax Stealth manuals
Add to My Manuals
Save this manual to your list of manuals |
Page 14 highlights
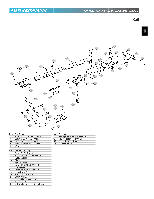
"V" Top of Door orte "V" Top of Door de la ort "V" Top of Door OR 14 "V" [96] [79] "V" [96] [79] "V" [96] [79] Sectional doors Fig. 2-6 One-piece doors 8. Install door bracket (Fig. 2-6). • Contact door manufacturer. NlfiogOrhTwt-Ewo:oeSdigedhlfot-dodrroisloliornngolnysl.cyr,ewwhsilearleaginstecnredweds faorreumseeawnitth bccooennrBcteaeqecructnaiyiruneosgdueryadodnouodoroarrdddomdeoiastrin.iogunnfaaslcvmtuaarrtyee,rrmiwaoiltsdhnifaiecneaydtieqodun.esPsmtlieoaanysse OPEN YELLOW PARTS BAG [96] 1/4"-20 x 3/4" Self-Drilling Screw 1/4" x 2" Lag Screw [79] 14" MIN. Clevis Cotter pin pin [[8990]] 9. Install door arms (Fig. 2-7). • Attach straight door arm to carriage. - slip straight door arm into slot at bottom of - sceacrruiaregewaiths schleovwisnp. in [90] and cotter pin [89] . • Attach short end of curved door arm to door bracket as shown. - dsloiporsbhroarctkeent.d of curved door arm into slot in • -Resleecausreecwairtrhiacgleev(isSepeineamnedrgcoetntecrypreinle. ase tag). - - slide stop carriage carriage towards closed door. 14" minimum from door. 10. J• ofUliansnedgtoewonoru(at2sr)m[39/2s8]e".cxti7o/n8s" h(Fexigb.o2l-t8s)[.91], and hex • T--iagusllhsiigdeteneanhcnhaoyerlertxwisan.oguehtsoblaseecskcauasrnefdlay.rfoarptharatsansepeodsesdibtleo. 11. Adjust emergency release cord length. • Mtheouflnototrh.e emergency release knob 6 feet from • Retie overhand knot and trim excess cord. DO NOT plug power cord into outlet. GSYoStoTESMecItNioSnT3A-LSLAAFTEIO-TN-B.EAM® - PROCEED TO PAGE 18 - [90]Clevis pin Straight door arm Curved door arm [89]Cotter pin Fig. 2-7 Straight door arm B3/o8l-t1,6[9x17]/8" Curved door arm [92] 3/8-16 nut Fig. 2-8 [92] [91] Nut, 3/8-16 Bolt, 3/8"-16 x 7/8"
-
 1
1 -
2
-
3
-
4
-
5
-
6
-
7
-
8
-
 9
9 -
 10
10 -
 11
11 -
 12
12 -
 13
13 -
 14
14 -
 15
15 -
 16
16 -
 17
17 -
 18
18 -
 19
19 -
20
-
21
-
22
-
23
-
24
-
25
-
26
-
27
-
28
-
29
-
30
-
31
-
32
 |
 |
