Genie ScrewDrive Owner's Manual - Page 18
Fig. 2-8
 |
View all Genie ScrewDrive manuals
Add to My Manuals
Save this manual to your list of manuals |
Page 18 highlights
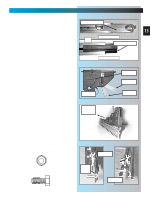
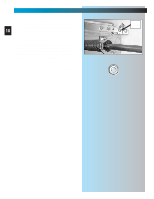
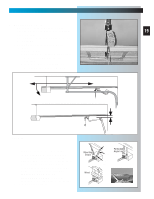
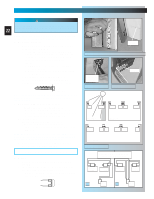
INSTALLATION FOR HELP-1.800.354.3643 OR GENIECOMPANY.COM 7. Attaching rail to header bracket. • Gently set power head on garage floor while leaning rail strap against header bracket. (It 18 is recommended that you place a piece of cardboard or similar material between power head and floor to prevent scrapes and scratches to power head.) NOTE: It may be necessary to support power head above floor. As little as a few inches, or as much as 5 or 6 feet depending on position of torsion spring(s). Be sure to use a stable support device, such as a ladder. • Slide threaded stud of rail strap through hole in flange of header bracket. • Fasten with nut [9], finger tight only. Fig. 2-8. Fig. 2-8 5/16" FLANGE NUT [9] 5/16" Flange nut
-
 1
1 -
2
-
3
-
4
-
5
-
6
-
7
-
8
-
9
-
10
-
11
-
12
-
 13
13 -
 14
14 -
 15
15 -
 16
16 -
 17
17 -
 18
18 -
 19
19 -
 20
20 -
 21
21 -
 22
22 -
 23
23 -
24
-
25
-
26
-
27
-
28
-
29
-
30
-
31
-
32
-
33
-
34
-
35
 |
 |

18
INSTALLATION
FOR HELP-1.800.354.3643 OR GENIECOMPANY.COM
7.
Attaching rail to header bracket.
•
Gently set power head on garage floor while
leaning rail strap against header bracket. (It
is recommended that you place a piece of
cardboard or similar material between power
head and floor to prevent scrapes and
scratches to power head.)
NOTE: It may be necessary to support power
head above floor. As little as a few inches, or
as much as 5 or 6 feet depending on position
of torsion spring(s). Be sure to use a stable
support device, such as a ladder.
•
Slide threaded stud of rail strap through hole
in flange of header bracket.
•
Fasten with nut [9], finger tight only.
Fig. 2-8
.
Fig. 2-8
5/16" Flange nut
[9]
5/16"
FLANGE
NUT