Genie ScrewDrive Owner's Manual - Page 20
Fig. 2-12b, Fig. 2-12a, Fig. 2-13, Wooden One-piece, Light-weight Al
 |
View all Genie ScrewDrive manuals
Add to My Manuals
Save this manual to your list of manuals |
Page 20 highlights
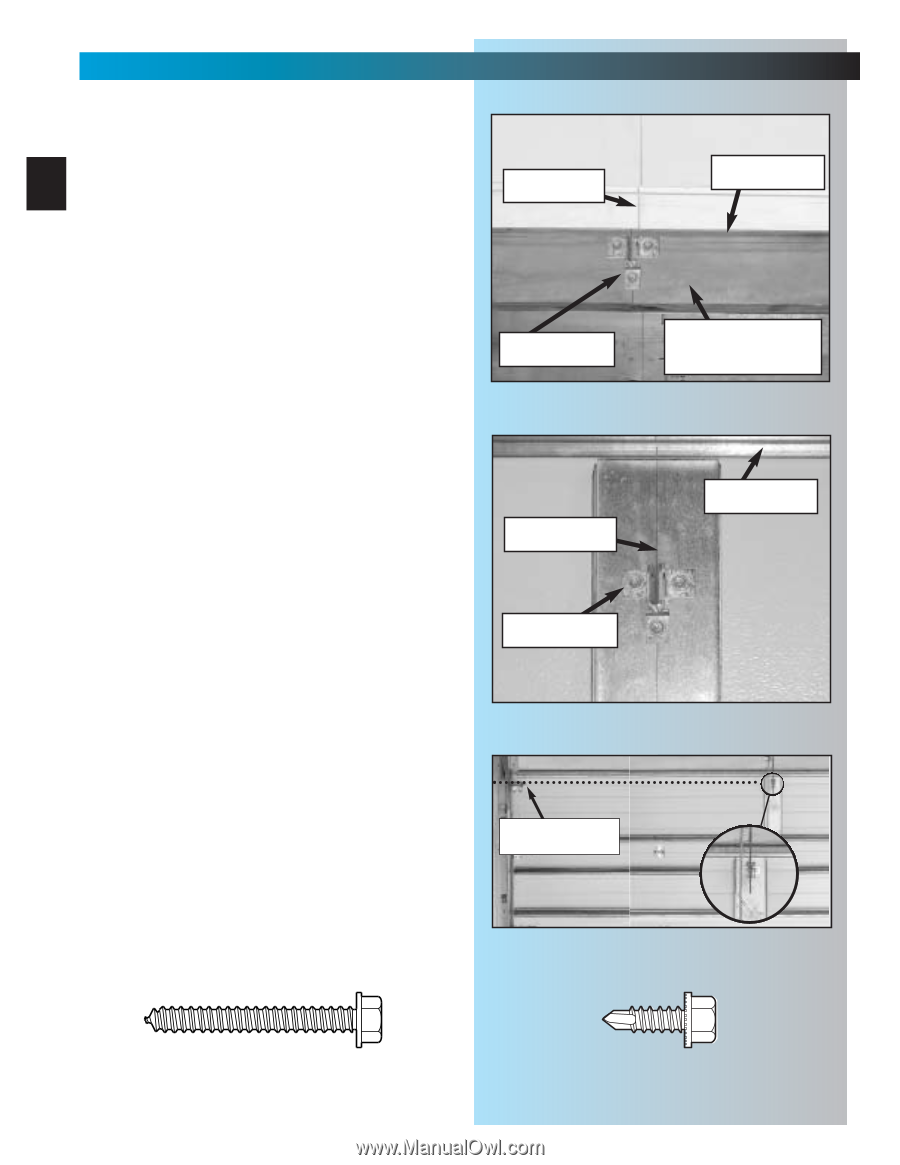
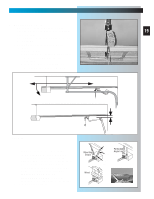
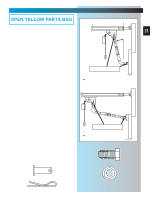
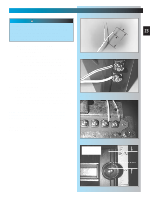
INSTALLATION FOR HELP-1.800.354.3643 OR GENIECOMPANY.COM 9. Mounting door bracket [21]. • Center of bracket must be on centerline of door and must be mounted as high as 20 possible. Fig. 2-12A & B. • Hold bracket against door at preferred location and mark screw holes. - for wooden doors, drill 5/32 inch pilot holes. a. Fasten door bracket using 3 lag screws [22]. b. Check thickness of door against lag screws. (It may be necessary to mount door bracket on a 2" x 6", etc. attached to inside of door to prevent screws from coming out other side of garage door. Fig. 2-12A. WOODEN ONE-PIECE centerline top of door door bracket Fig. 2-12A attached board for extra thickness - for light-weight doors CAUTION: In the case of sectional doors, the door bracket must not be below the highest set of rollers. Fig. 2-13. - there are a wide variety of reinforcements depending on manufacturer and some are equipped with hardware that is intended to be used in place of the door bracket. Be sure to confirm proper use of this hardware with your door manufacturer. Unauthorized improper use of these attachment systems could void your warranty. WHEREVER POSSIBLE-USE DOOR BRACKET SUPPLIED WITH YOUR GENIE OPERATOR. a. Fasten door bracket using 3 self-drilling screws [47]. centerline top of door door bracket LIGHT-WEIGHT SECTIONAL Fig. 2-12B even with or above top roller 1/4" x 2" Lag screw Fig. 2-13 [22] [47] 1/4"-20 Self-drilling screw
-
 1
1 -
2
-
3
-
4
-
5
-
6
-
7
-
8
-
9
-
10
-
11
-
12
-
13
-
14
-
 15
15 -
 16
16 -
 17
17 -
 18
18 -
 19
19 -
 20
20 -
 21
21 -
 22
22 -
 23
23 -
 24
24 -
 25
25 -
26
-
27
-
28
-
29
-
30
-
31
-
32
-
33
-
34
-
35
 |
 |