Genie ScrewDrive Owner's Manual - Page 27
Sect 7-settings - vehicle
 |
View all Genie ScrewDrive manuals
Add to My Manuals
Save this manual to your list of manuals |
Page 27 highlights
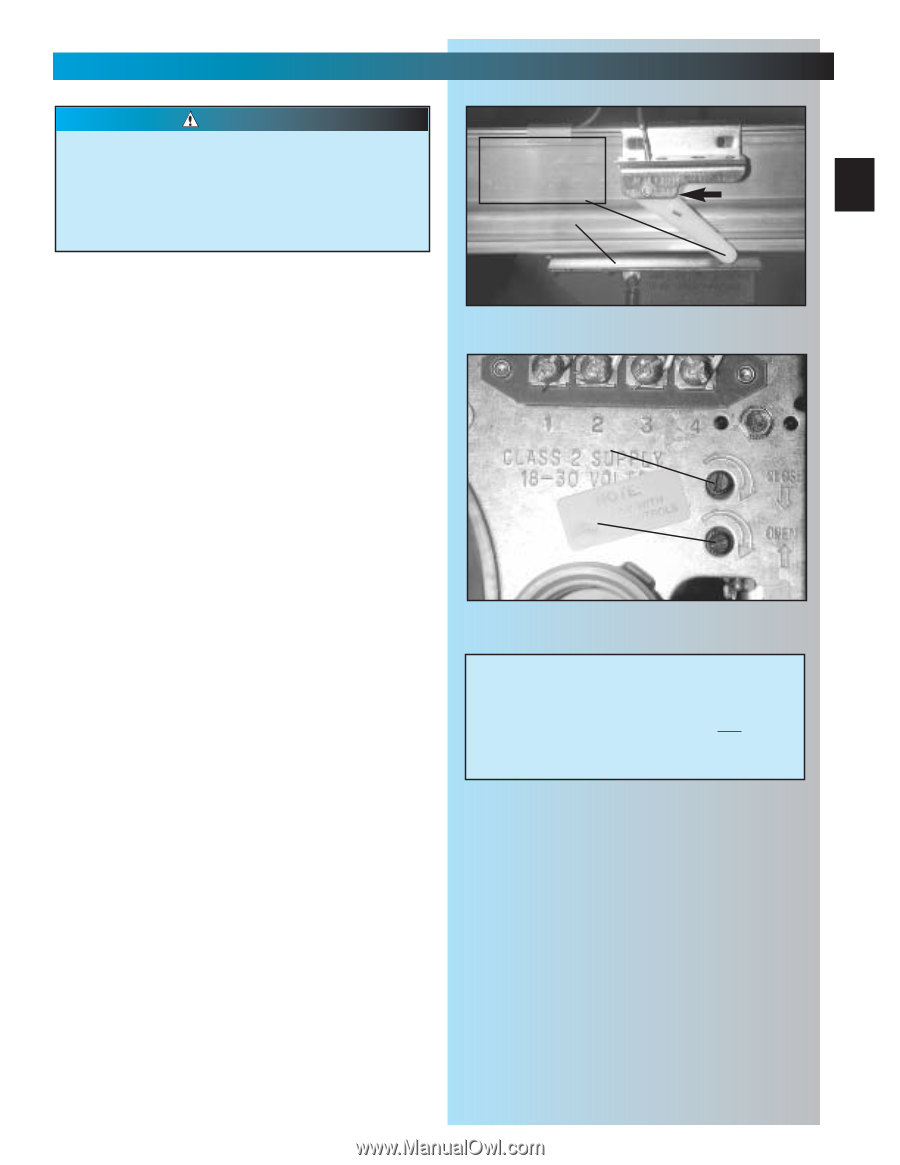
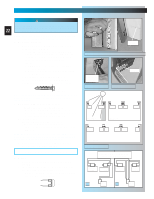
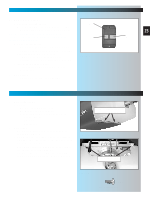
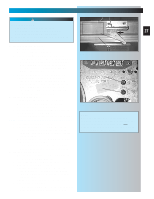
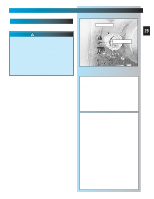
SECT 7-SETTINGS (FORCE & LIMITS) FOR HELP-1.800.354.3643 OR GENIECOMPANY.COM CAUTION Door opens rapidly • Keep clear of door and its path. • Keep ladder to side of power head to prevent being hit by moving parts. Be sure and set force adjustments at minimum required to operate door. lever (actuator arm) fully lifted CARRIAGE SLIDE 27 SWITCH 1. Set limit switch position. • Check door fully closed. - If not, close door manually. • Check carriage is between limit switches. - If not, move "CLOSE" limit switch (brown wire) to new position between door and carriage. - Slide "CLOSE" limit switch back toward carriage until lever is fully lifted. Fig. 7-1. - Tighten limit switch set screw. • Manually open door to fully open position.. • Check carriage is between limit switches. - If not, move "OPEN" limit switch to new position between power head and carriage. - Slide "OPEN" limit switch back toward carriage until lever is fully lifted. Fig. 7-1. - Tighten limit switch set screw. 2. Adjust opening force. • Engage Carriage by pulling Emergency Release Lever toward Powerhead until Lever snaps into engaged position. • On front panel of power head-find adjusting screw marked "CLOSE." Fig. 7-2. • Turn screw gently counterclockwise until it stops. NOTE: Little force required to move adjusting screws. • Run operator using wall control. • Observe door runs to "CLOSE" limit switch. - If not, increase closing force by turning "CLOSE" adjusting screw clockwise slightly (about 1/16 turn). • Repeat until door runs to "CLOSE" limit switch. • Check door is fully closed. - If not, move "CLOSE" limit switch toward door as necessary to achieve fully closed. 3. Adjust closing force. • On front panel of power head-find adjusting screw marked "OPEN." Fig. 7-2. • Turn screw gently counterclockwise until it stops. • Run operator using wall control. • Observe door runs to "OPEN" limit switch. - If not, increase opening force by turning "OPEN" adjusting screw clockwise slightly (about 1/16 turn). • Repeat until door runs to "OPEN" limit switch. • Check door is fully open. - If not, move "OPEN" limit switch toward power head as necessary to achieve fully open. Fig. 7-1 CLOSE OPEN Fig. 7-2 NOTE: When the garage door is closing and contacts a vehicle or other obstruction, the contact reverse mechanism may not prevent damage to the obstruction, garage door or garage door operator.
-
 1
1 -
2
-
3
-
4
-
5
-
6
-
7
-
8
-
9
-
10
-
11
-
12
-
13
-
14
-
15
-
16
-
17
-
18
-
19
-
20
-
21
-
 22
22 -
 23
23 -
 24
24 -
 25
25 -
 26
26 -
 27
27 -
 28
28 -
 29
29 -
 30
30 -
 31
31 -
 32
32 -
33
-
34
-
35
 |
 |