Gigabyte GA-8I945P-G Manual - Page 22
Define RAID
 |
View all Gigabyte GA-8I945P-G manuals
Add to My Manuals
Save this manual to your list of manuals |
Page 22 highlights
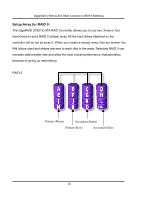
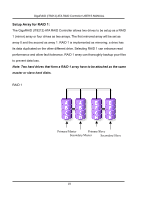
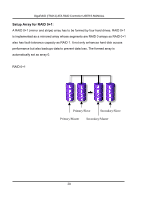
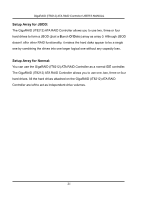
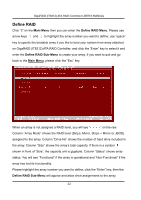
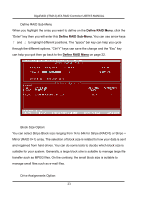
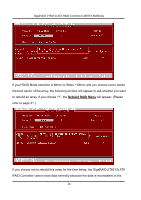
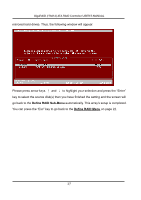
GigaRAID (IT8212) ATA RAID Controller USER'S MANUAL Define RAID Click "2" on the Main Menu then you can enter the Define RAID Menu. Please use arrow keys ↑ and ↓ to highlight the array number you want to define; use "space" key to specify the bootable array if you like to boot your system from array attached on GigaRAID (IT8212) ATA RAID Controller; and click the "Enter" key to select it and enter the Define RAID Sub-Menu to create your array. If you want to quit and go back to the Main Menu, please click the "Esc" key. When an array is not assigned a RAID level, you will see " " on the raw. Column "Array Mode" shows the RAID level (Stripe, Mirror, Stripe + Mirror or JBOD) assigned to the array. Column "Drive No" shows the number of hard drive included in the array. Column "Size" shows the array's total capacity. If there is a symbol shown in front of "Size", the capacity unit is gigabyte. Column "Status" shows array status. You will see "Functional" if the array is operational and "Non-Functional" if the array has lost its functionality. Please highlight the array number you want to define, click the "Enter" key, then the Define RAID Sub-Menu will appear and allow drive assignments to the array. 22
-
 1
1 -
2
-
3
-
4
-
5
-
6
-
7
-
8
-
9
-
10
-
11
-
12
-
13
-
14
-
15
-
16
-
 17
17 -
 18
18 -
 19
19 -
 20
20 -
 21
21 -
 22
22 -
 23
23 -
 24
24 -
 25
25 -
 26
26 -
 27
27 -
28
-
29
-
30
-
31
-
32
-
33
-
34
-
35
-
36
-
37
-
38
-
39
-
40
-
41
-
42
-
43
-
44
-
45
-
46
-
47
-
48
-
49
-
50
-
51
-
52
-
53
-
54
-
55
-
56
-
57
-
58
-
59
-
60
-
61
-
62
-
63
-
64
-
65
-
66
-
67
-
68
-
69
-
70
-
71
-
72
-
73
-
74
-
75
-
76
-
77
-
78
-
79
-
80
-
81
-
82
-
83
-
84
-
85
-
86
-
87
-
88
 |
 |
