Gigabyte GA-VM800PMC Manual - Page 64
Configuring RAID set in RAID BIOS
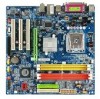 |
View all Gigabyte GA-VM800PMC manuals
Add to My Manuals
Save this manual to your list of manuals |
Page 64 highlights
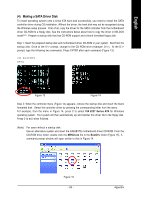
English (3) Configuring RAID set in RAID BIOS Enter the RAID BIOS setup utility to configure a RAID array. Skip this step and proceed to Section 4 if you do not want to create RAID. Step 1: After the POST memory test begins and before the operating system boot begins, the following information will appear on screen (Figure 3). Press the TAB key to enter the VT8237 Serial ATA RAID BIOS configuration utility. VIA Technologies, Inc. VIA VT8237 Serial ATA RAID BIOS Setting Utility V4.97 Copyright (C) VIA Technologies, Inc. All Right reserved. Scan Devices, Please wait... Press key into User Window! Serial_Ch0 Master : ST3120026AS Serial_Ch1 Master : ST3120026AS Figure 3 Step 2: In the VT8237 SATA RAID BIOS utility screen (Figure 4), you can use the UP or DOWN ARROW key to highlight through choices. Highlight an item that you want to execute and press ENTER. VIA Tech. VT8237 SATA RAID BIOS Ver 4.97 Create Array Delete Array Create/Delete Spare Select Boot Array Serial Number View Create a RAID array with the hard disks attached to VIA RAID controller F1 : , : Enter : ESC : View Array/disk Status Move to next item Confirm the selection Exit Channel Drive Name Serial_Ch0 Master ST3120026AS Serial_Ch1 Master ST3120026AS Array Name Mode SATA SATA Size(GB) Status 111.79 Hdd 111.79 Hdd Figure 4 GA-VM800PMC Motherboard - 64 -
-
 1
1 -
2
-
3
-
4
-
5
-
6
-
7
-
8
-
9
-
10
-
11
-
12
-
13
-
14
-
15
-
16
-
17
-
18
-
19
-
20
-
21
-
22
-
23
-
24
-
25
-
26
-
27
-
28
-
29
-
30
-
31
-
32
-
33
-
34
-
35
-
36
-
37
-
38
-
39
-
40
-
41
-
42
-
43
-
44
-
45
-
46
-
47
-
48
-
49
-
50
-
51
-
52
-
53
-
54
-
55
-
56
-
57
-
58
-
 59
59 -
 60
60 -
 61
61 -
 62
62 -
 63
63 -
 64
64 -
 65
65 -
 66
66 -
 67
67 -
 68
68 -
 69
69 -
70
-
71
-
72
-
73
-
74
-
75
-
76
-
77
-
78
-
79
-
80
-
81
-
82
-
83
-
84
-
85
-
86
-
87
-
88
 |
 |
