Gigabyte GA-VM800PMC Manual - Page 67
B. Delete Array, Delete Array, C. Select Boot Array, Select Boot Array
 |
View all Gigabyte GA-VM800PMC manuals
Add to My Manuals
Save this manual to your list of manuals |
Page 67 highlights
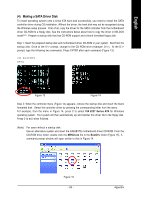
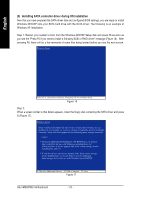
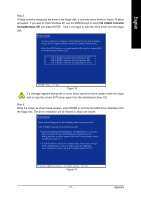
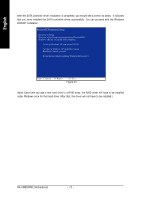
English B. Delete Array: If you want to delete an existing array, select Delete Array in Main Menu and press ENTER. The channel column will be activated. Select the member of an array that is to be deleted and press ENTER. A warning message will show up, press Y to confirm or press N to cancel (Figure 9). VIA Tech. VT8237 SATA RAID BIOS Ver 4.97 Create Array Delete Array Create/Delete Spare Select Boot Array Serial Number View The selected array will be destoried. Are you sure? Continue? Press Y/N Channel Drive Name [*]Serial_Ch0 Master ST3120026AS [*]Serial_Ch1 Master ST3120026AS Delete a RAID array contain the hard disks attached to VIA RAID controller F1 : , : Enter : ESC : View Array/disk Status Move to next item Confirm the selection Exit Array Name ARRAY 0 ARRAY 0 Mode SATA SATA Size(GB) Status 111.79 Stripe0 111.79 Stripe1 Figure 9 Deleting a disk array will destroy all the data on the disk array except for RAID 1 array(s). When a RAID 1 array is deleted, the data on the two hard drives will be reserved and the two hard drives will become two normal drives. C. Select Boot Array: You can select a disk array as boot device if you want to boot operating system from an array. Boot disk array cannot be selected if the operating system does not boot from the disk array. Highlight the Select Boot Array item in Main Menu; press ENTER and the channel column will be activated. Then highlight the target disk array and press ENTER. Press ESC to go back to Main Menu. If you want to cancel the boot array setting, select the disk array that has an asterisk and press ENTER, its boot setting will be canceled (Figure 10). VIA Tech. VT8237 SATA RAID BIOS Ver 4.97 Create Array Delete Array Create/Delete Spare Select Boot Array Serial Number View Channel Drive Name [*]Serial_Ch0 Master ST3120026AS [*]Serial_Ch1 Master ST3120026AS Set/Clear bootable array F1 : , : Enter : ESC : View Array/disk Status Move to next item Confirm the selection Exit Array Name ARRAY 0 ARRAY 0 Mode SATA SATA Size(GB) Status 111.79 Boot 111.79 Boot Figure 10 - 67 - Appendix
-
 1
1 -
2
-
3
-
4
-
5
-
6
-
7
-
8
-
9
-
10
-
11
-
12
-
13
-
14
-
15
-
16
-
17
-
18
-
19
-
20
-
21
-
22
-
23
-
24
-
25
-
26
-
27
-
28
-
29
-
30
-
31
-
32
-
33
-
34
-
35
-
36
-
37
-
38
-
39
-
40
-
41
-
42
-
43
-
44
-
45
-
46
-
47
-
48
-
49
-
50
-
51
-
52
-
53
-
54
-
55
-
56
-
57
-
58
-
59
-
60
-
61
-
 62
62 -
 63
63 -
 64
64 -
 65
65 -
 66
66 -
 67
67 -
 68
68 -
 69
69 -
 70
70 -
 71
71 -
 72
72 -
73
-
74
-
75
-
76
-
77
-
78
-
79
-
80
-
81
-
82
-
83
-
84
-
85
-
86
-
87
-
88
 |
 |