HTC Touch Pro Sprint User Guide - Page 88
My Voices, Add/Delete, Menu > Send, Menu > Beam File, Menu > Set as Ringtone
 |
View all HTC Touch Pro Sprint manuals
Add to My Manuals
Save this manual to your list of manuals |
Page 88 highlights
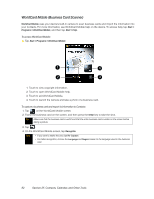
To select or create a folder in which to save voice recordings: By default, all recordings are saved in the My Voices folder of the device. You can choose another folder or create a new folder to save your voice recordings. Tip If a microSD card is installed before you open Voice Recorder, the recordings are saved in the My Voices folder on the microSD card by default. 1. Tap the arrow beside the folder name on the upper left side of the screen. 2. In the menu that opens, choose an existing folder or touch Add/Delete to create a new folder. To play back a voice recording: ᮣ On the Voice Recorder screen, touch a voice recording, or navigate to a voice recording and then tap Play ( ). Tip If you need to adjust the sound volume, touch any of the status icons on the title bar and then touch the volume icon ( ) to open the System Volume screen where you can adjust the volume. To send a voice recording via email: ᮣ Select a voice recording, tap Menu > Send, and then select an email account. This creates a new email message with the voice recording inserted as a file attachment. See "Email Messaging" on page 162 to learn how to send email. To beam a voice recording via Bluetooth: 1. Select the voice recording you want to beam, and then tap Menu > Beam File. Tip To select multiple recordings, tap and drag over the desired recordings or tap Menu > Select All. 2. Tap the device you want to send the voice recording to. 3. On the other device, accept the file transfer to receive the file. To set a voice recording as a ring tone: ᮣ Select the voice recording, and then tap Menu > Set as Ringtone. To rename or move a recording: 1. Select the voice recording, and then tap Menu > Rename/Move. Tip To select multiple recordings, tap and drag over the desired recordings or tap Menu > Select All. Note that you can move multiple files, but you cannot rename multiple files simultaneously. 2. In the Name box, enter the new voice recording name. 3. To move the voice recording, select the new destination in the Folder and Location boxes, and then tap ok. 80 Section 2F. Contacts, Calendar, and Other Tools
-
 1
1 -
2
-
3
-
4
-
5
-
6
-
7
-
8
-
9
-
10
-
11
-
12
-
13
-
14
-
15
-
16
-
17
-
18
-
19
-
20
-
21
-
22
-
23
-
24
-
25
-
26
-
27
-
28
-
29
-
30
-
31
-
32
-
33
-
34
-
35
-
36
-
37
-
38
-
39
-
40
-
41
-
42
-
43
-
44
-
45
-
46
-
47
-
48
-
49
-
50
-
51
-
52
-
53
-
54
-
55
-
56
-
57
-
58
-
59
-
60
-
61
-
62
-
63
-
64
-
65
-
66
-
67
-
68
-
69
-
70
-
71
-
72
-
73
-
74
-
75
-
76
-
77
-
78
-
79
-
80
-
81
-
82
-
 83
83 -
 84
84 -
 85
85 -
 86
86 -
 87
87 -
 88
88 -
 89
89 -
 90
90 -
 91
91 -
 92
92 -
 93
93 -
94
-
95
-
96
-
97
-
98
-
99
-
100
-
101
-
102
-
103
-
104
-
105
-
106
-
107
-
108
-
109
-
110
-
111
-
112
-
113
-
114
-
115
-
116
-
117
-
118
-
119
-
120
-
121
-
122
-
123
-
124
-
125
-
126
-
127
-
128
-
129
-
130
-
131
-
132
-
133
-
134
-
135
-
136
-
137
-
138
-
139
-
140
-
141
-
142
-
143
-
144
-
145
-
146
-
147
-
148
-
149
-
150
-
151
-
152
-
153
-
154
-
155
-
156
-
157
-
158
-
159
-
160
-
161
-
162
-
163
-
164
-
165
-
166
-
167
-
168
-
169
-
170
-
171
-
172
-
173
-
174
-
175
-
176
-
177
-
178
-
179
-
180
-
181
-
182
-
183
-
184
-
185
-
186
-
187
-
188
-
189
-
190
-
191
-
192
-
193
-
194
-
195
-
196
-
197
-
198
-
199
-
200
-
201
-
202
-
203
-
204
-
205
-
206
-
207
-
208
-
209
-
210
-
211
-
212
-
213
-
214
-
215
-
216
-
217
-
218
-
219
-
220
 |
 |
