Harman Kardon 1000 Owners Manual - Page 30
Media Library, NOTES, Solid-State Media
 |
View all Harman Kardon 1000 manuals
Add to My Manuals
Save this manual to your list of manuals |
Page 30 highlights
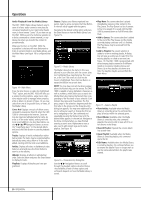
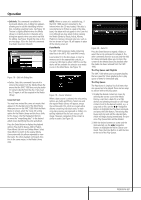
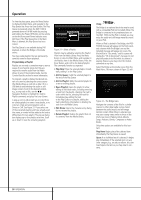
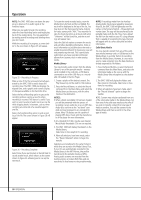
Operation NOTE: The DMC 1000 does not detect the presence or absence of an audio signal at the Auxiliary Inputs. When you are ready to begin the recording, select the Start Recording option and begin playback of the analog device. You may experiment by making several recordings and deleting those you don't want. While the recording is in progress, a screen similar to the one shown in Figure 25 will appear. Figure 25 - Recording in Progress Make a note of the file name automatically generated by the DMC 1000 to easily locate the recording later. The DMC 1000 also displays the elapsed time, and a graphic and numeric display of the space available on the hard-disc drive. Select the Pause Recording option to pause the recording without starting a new file when recording is resumed. This feature is useful if you wish to record a series of audio tracks as one file while skipping breaks in between, such as when recording an entire side of a cassette tape into one file. Select the Stop Recording option to end recording of the file. The screen shown in Figure 26 will appear. Figure 26 - Recording Complete Select Done if you are finished, or Record Next to record another track, which returns to the screen shown in Figure 25, allowing you to cue up the next track. To locate the newly recorded tracks, view the Media Library by Track and by Last Added. The track will be displayed at the top of the list. You may also sort the Track view by Name, looking for tracks starting with "AUX." You may wish to view the Tracks by Artist, as all tracks with artist "Unknown" will be listed first, and the recordings will appear here. Select the Edit Info option to rename the tracks and add other identifying information. Enter as much information as possible about the track to enable Gracenote MusicID to locate any cover art and properly tag the track. This is particularly useful when you have recorded commercial albums from cassette, vinyl or other analog media. Media Library You may transfer audio content from the Media Library to any of the portable media - memory cards installed in the card slots, a USB device connected to one of the USB Ports, or a recordable CD loaded in the Disc Player. 1. Create a playlist of the desired content. The Play Queue may not be used for this purpose. 2. Press the Record Button, or select the Record command from the Main Menu, and select the Media Library as the source, with the other media as the destination. NOTES: • When a blank recordable CD has been loaded, you will be presented with the options of recording it as an audio disc or as an MP3 disc. Audio discs conform to the "red book" standard and may be played in any standard CD player. Many CD players are not capable of playing MP3 discs. Check with the manufacturer of the player for more information. • Any standard CD-R disc may be used. Special Music/Audio Recordable CDs are not required. 3. The DMC 1000 will display the playlists in the Media Library. Select one or more playlists for recording. 4. When all selections have been made, select the "Record Selected" option to begin the transfer. Selections are transferred in the same format in which they are stored in the Media Library. Thus, if your CDs are automatically recorded to the Media Library in the MP3 format, they will be transferred to the portable media as MP3s. Analog audio streams are recorded from the Auxiliary Inputs as lossless WAV files, and are transferred in that format to the portable media. NOTE: If recordings made from the Auxiliary Analog Audio Inputs were tagged by Gracenote MusicID, the DMC 1000 will generate new file names in the format of [artist] - [three-digit track number].wav. The tags will be transferred to the portable media with the file. Thus, if you upload the file from the media to your PC using software that is capable of recognizing the tags, the track will appear with its correct song title and other information. Solid-State Media You may transfer content from any of the solidstate media (memory cards or USB device) to the Media Library in a similar fashion to recording from the Media Library. However, it is not necessary to create a playlist, since the data media are already organized as file folders. 1. Press the Record Button, or select the Record command from the Main Menu, and select the solid-state media as the source, with the Media Library (the only option) as the destination. 2. The DMC 1000 will display the folders and files stored on the media. Select one or more items for recording. 3. When all selections have been made, select the "Record Selected" option to begin the transfer. NOTE: Content may only be transferred from one of the solid-state media to the Media Library, not from one of the solid-state media to the other. If you wish to transfer content from one type of media to another, first add the content to the Media Library, and then record it to the other type of media. 30 OPERATION
-
 1
1 -
2
-
3
-
4
-
5
-
6
-
7
-
8
-
9
-
10
-
11
-
12
-
13
-
14
-
15
-
16
-
17
-
18
-
19
-
20
-
21
-
22
-
23
-
24
-
 25
25 -
 26
26 -
 27
27 -
 28
28 -
 29
29 -
 30
30 -
 31
31 -
 32
32 -
 33
33 -
 34
34 -
 35
35 -
36
-
37
-
38
-
39
-
40
-
41
-
42
 |
 |
