Hayward Universal H-Series Low NOx Service/Installation: H150FDN H200FDN H25 - Page 10
Pomona, CA Clemmons, NC Nashville, TN, Tel: 908-351-5400, TABLE - h150fdp
 |
View all Hayward Universal H-Series Low NOx manuals
Add to My Manuals
Save this manual to your list of manuals |
Page 10 highlights
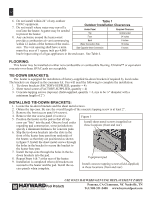
10 FDXLHAK1930 (sold separately) may be necessary. 3. If installing indoors, select the appropriate high-altitude indoor vent pressure switch from the indoor adapter kit or from the FDXLVPS1931 kit. Each switch has a label which identifies which model(s) and altitude range(s) it is designed for. 4. If connected, turn pump, main gas valve, and heater power off. 5. Remove heater front access door. 6. Remove the 4 #10 hex head screws that fasten the blower air inlet plate to the blower, and remove the blower air plate and discard. Save the 4 screws as they will be needed to install the new plate. See Figure 49 (page 47). 7. Install the appropriate blower plate from the kit using the 4 screws. It may be helpful to drive the screws in and out of the plate outside of the heater first to "thread" the holes before installing it in the heater. 8. If the installation is configured for indoor venting, a special high-altitude vent pressure switch must be installed. Follow the instructions for vent kit installation (page 17), but use the appropriate blower air inlet plate and vent pressure switch for your altitude. 9. Re-install heater front door. 10. If connected, turn pump, main gas valve, and heater power back on. 11. Activate heater and check for proper function. Table A lists the maximum altitudes each model is designed for with: a) no modifications, b) the included conversion plate installed, and c) the accessory conversion kit FDXLHAK1930 installed (sold separately). TABLE A Heater Model Gas H150FDN NAT H150FDP LP H200FDN NAT H200FDP LP H250FDN NAT H250FDP LP H300FDN NAT H300FDP LP H350FDN NAT H350FDP LP H400FDN NAT H400FDP LP Maximum Installation Altitude Outdoor Installation Indoor Installation * No Modifications to Heater Included Conversion Plate Installed on Heater Conversion kit FDXLHAK1930 Installed on Heater No Modifications to Heater Included Conversion Plate Installed on Heater Conversion kit FDXLHAK1930 Installed on Heater 7,700 ft 7,700 ft 10,100 ft 5,400 ft 5,400 ft 2,000 ft 10,100 ft 2,000 ft 2,000 ft 2,000 ft 10,100 ft 2,000 ft N/A N/A N/A 10,100 ft 10,100 ft 7,700 ft N/A 10,100 ft 10,100 ft 7,700 ft N/A 7,700 ft 10,100 ft 10,100 ft N/A N/A N/A 10,100 ft N/A N/A N/A 10,100 ft N/A 10,100 ft 10,100 ft 2,000 ft 10,100 ft 2,000 ft 2,000 ft 2,000 ft 10,100 ft 2,000 ft 2,000 ft 2,000 ft 10,100 ft 2,000 ft N/A 10,100 ft N/A 10,100 ft 10,100 ft 7,700 ft N/A 10,100 ft 10,100 ft 7,700 ft N/A 7,700 ft N/A N/A N/A N/A N/A 10,100 ft N/A N/A N/A 10,100 ft N/A 10,100 ft * All indoor installations at altitudes above 2,000 ft also require a special vent pressure switch to be installed in addition to the blower air inlet plate. The special vent pressure switch is included with the appropriate indoor vent kit (UHXNEGVT1xxx or UHXPOSHZ1xxx), or the high-altitude vent pressure switch kit FDXLVPS1931. USE ONLY HAYWARD GENUINE REPLACEMENT PARTS Pomona, CA Clemmons, NC Nashville, TN Tel: 908-351-5400 www.haywardpool.com
-
 1
1 -
2
-
3
-
4
-
 5
5 -
 6
6 -
 7
7 -
 8
8 -
 9
9 -
 10
10 -
 11
11 -
 12
12 -
 13
13 -
 14
14 -
 15
15 -
16
-
17
-
18
-
19
-
20
-
21
-
22
-
23
-
24
-
25
-
26
-
27
-
28
-
29
-
30
-
31
-
32
-
33
-
34
-
35
-
36
-
37
-
38
-
39
-
40
-
41
-
42
-
43
-
44
-
45
-
46
-
47
-
48
-
49
-
50
-
51
-
52
-
53
-
54
-
55
-
56
-
57
-
58
-
59
-
60
-
61
-
62
-
63
-
64
 |
 |
