HP 10842 10000 Series Rack Reference Guide - Page 27
Removing the Rack Doors, Unlock the door 1 and press the handle release button 2. The handle pops out.
 |
View all HP 10842 manuals
Add to My Manuals
Save this manual to your list of manuals |
Page 27 highlights
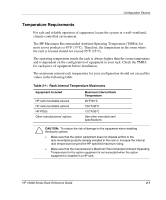
Preparing the Rack for Component Installation Removing the Rack Doors To provide access to all sides of the rack while you are installing the various components, first remove the rack doors. If your rack has side panels, also remove them before installing mounting brackets and other hardware. To remove the rack front door: 1. Unlock the door (1) and press the handle release button (2). The handle pops out. 2. Lift the handle up and out to open the door (3). 3 1 2 Figure 3-1: Opening the front door HP 10000 Series Rack Reference Guide 3-3
-
 1
1 -
2
-
3
-
4
-
5
-
6
-
7
-
8
-
9
-
10
-
11
-
12
-
13
-
14
-
15
-
16
-
17
-
18
-
19
-
20
-
21
-
 22
22 -
 23
23 -
 24
24 -
 25
25 -
 26
26 -
 27
27 -
 28
28 -
 29
29 -
 30
30 -
 31
31 -
 32
32 -
33
-
34
-
35
-
36
-
37
-
38
-
39
-
40
-
41
-
42
-
43
-
44
-
45
-
46
-
47
-
48
-
49
-
50
-
51
-
52
-
53
-
54
-
55
-
56
-
57
-
58
-
59
-
60
-
61
-
62
-
63
-
64
-
65
-
66
-
67
-
68
-
69
-
70
-
71
-
72
-
73
-
74
-
75
 |
 |

Preparing the Rack for Component Installation
HP 10000 Series Rack Reference Guide
3-3
Removing the Rack Doors
To provide access to all sides of the rack while you are installing the various
components, first remove the rack doors. If your rack has side panels, also remove
them before installing mounting brackets and other hardware.
To remove the rack front door:
1.
Unlock the door (1) and press the handle release button (2). The handle pops out.
2.
Lift the handle up and out to open the door (3).
2
3
1
Figure 3-1:
Opening the front door