HP 14t-r000 HP 14 Notebook PC Compaq 14 Notebook PC HP 240 G3 Notebook PC HP 2 - Page 63
Reverse this procedure to install the keyboard., Component replacement procedures
 |
View all HP 14t-r000 manuals
Add to My Manuals
Save this manual to your list of manuals |
Page 63 highlights
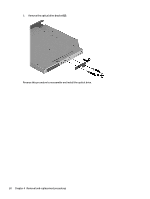
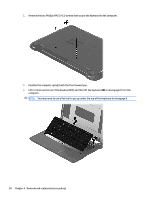
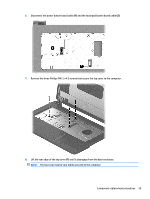
5. Rotate the keyboard over onto the palm rest (1), and the lift the ZIF connector (2) and disconnect the keyboard cable from the system board (3). Reverse this procedure to install the keyboard. Component replacement procedures 55
-
 1
1 -
2
-
3
-
4
-
5
-
6
-
7
-
8
-
9
-
10
-
11
-
12
-
13
-
14
-
15
-
16
-
17
-
18
-
19
-
20
-
21
-
22
-
23
-
24
-
25
-
26
-
27
-
28
-
29
-
30
-
31
-
32
-
33
-
34
-
35
-
36
-
37
-
38
-
39
-
40
-
41
-
42
-
43
-
44
-
45
-
46
-
47
-
48
-
49
-
50
-
51
-
52
-
53
-
54
-
55
-
56
-
57
-
 58
58 -
 59
59 -
 60
60 -
 61
61 -
 62
62 -
 63
63 -
 64
64 -
 65
65 -
 66
66 -
 67
67 -
 68
68 -
69
-
70
-
71
-
72
-
73
-
74
-
75
-
76
-
77
-
78
-
79
-
80
-
81
-
82
-
83
-
84
-
85
-
86
-
87
-
88
-
89
-
90
-
91
-
92
-
93
-
94
-
95
-
96
-
97
-
98
-
99
-
100
-
101
-
102
-
103
-
104
-
105
-
106
-
107
-
108
-
109
-
110
-
111
-
112
-
113
-
114
-
115
-
116
-
117
-
118
-
119
-
120
-
121
-
122
-
123
-
124
-
125
-
126
-
127
-
128
-
129
-
130
-
131
-
132
-
133
-
134
-
135
-
136
-
137
-
138
-
139
-
140
-
141
-
142
-
143
-
144
 |
 |
5.
Rotate the keyboard over onto the palm rest
(1)
, and the lift the ZIF connector
(2)
and disconnect the
keyboard cable from the system board
(3)
.
Reverse this procedure to install the keyboard.
Component replacement procedures
55