HP 2300n HP Business Inkjet 2300 - Getting Started Guide - Page 19
Paralleler Anschluss Windows
 |
View all HP 2300n manuals
Add to My Manuals
Save this manual to your list of manuals |
Page 19 highlights
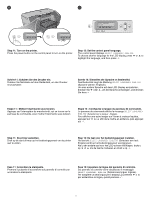
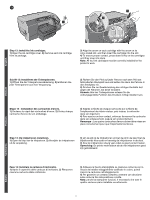
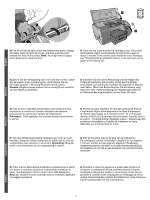
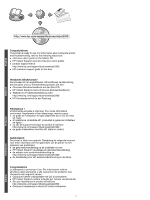
15 1 2 1 2 2 2 Step 15: Install the software and connect the printer. Follow the instructions for your connection type. For details, see the onscreen user's guide on the Starter CD. Parallel connection (Windows): 1) Insert the Starter CD into the CD-ROM drive, and then follow the installation procedure for your operating system and connection (parallel). 2) When prompted by the installer software, connect the parallel cable to the printer and to the computer. USB connection (Windows): 1) Insert the Starter CD into the CD-ROM drive, and then follow the installation procedure for your operating system and connection (USB). 2) When prompted by the installer software, connect the USB cable to the printer and to the computer. Schritt 15: Installieren der Software und Anschließen des Druckers. Folgen Sie den Anweisungen für Ihren Verbindungstyp. Informationen finden Sie im Onscreen-Benutzerhandbuch auf der Start-CD. Paralleler Anschluss (Windows): 1) Legen Sie die Start-CD in das CD-ROM-Laufwerk, und folgen Sie der Installation für Ihr Betriebssystem und Ihre Verbindung (parallel). 2) Schließen Sie das Parallelkabel an Drucker und Computer an, wenn das Installationsprogramm Sie dazu auffordert. USB-Anschluss (Windows): 1) Legen Sie die Start-CD in das CD-ROM-Laufwerk, und folgen Sie der Installation für Ihr Betriebssystem und Ihre Verbindung (USB). 2) Schließen Sie das USB-Kabel an Drucker und Computer an, wenn das Installationsprogramm Sie dazu auffordert. Etape 15 : installation du logiciel et branchement de l'imprimante. Suivez les instructions correspondant à votre type de connexion. Pour plus d'informations, reportez-vous au guide de l'utilisateur en ligne disponible sur le CD de mise en route. Connexion parallèle (Windows) : 1) Introduisez le CD de mise en route dans le lecteur de CD-ROM et suivez les instructions relatives à votre système d'exploitation et à votre connexion (parallèle). 2) Lorsque le programme d'installation vous y invite, connectez le câble parallèle à l'imprimante et à l'ordinateur. Connexion USB (Windows) : 1) Introduisez le CD de mise en route dans le lecteur de CD-ROM et suivez les instructions relatives à votre système d'exploitation et à votre connexion (USB). 2) Lorsque le programme d'installation vous y invite, connectez le câble USB à l'imprimante et à l'ordinateur. Stap 15: De software installeren en de printer aansluiten. Volg de instructies voor het gewenste type aansluiting. Raadpleeg de gebruikershandleiding van de installatie-cd-rom voor meer informatie. Parallelle aansluiting (Windows): 1) Plaats de installatie-cd-rom in het cd-rom-station en volg de installatieprocedure voor het besturingssysteem en de aansluiting (parallel). 2) Sluit de parallelle kabel aan op de printer en de computer wanneer dit wordt gevraagd. USB-aansluiting (Windows): 1) Plaats de installatie-cd-rom in het cd-rom-station en volg de installatieprocedure voor het besturingssysteem en de aansluiting (USB). 2) Sluit de USB-kabel aan op de printer en de computer wanneer dit wordt gevraagd. Fase 15: Installare il software e collegare la stampante. Seguire le istruzioni per il tipo di collegamento corretto. Per ulteriori informazioni, vedere la Guida per l'utente visualizzabile nel CD di avviamento. Collegamento parallelo (Windows): 1) Inserire il CD di avviamento nell'unità CD-ROM, quindi seguire la procedura di installazione relativa al proprio sistema operativo e al collegamento parallelo. 2) Quando richiesto dal software di installazione, collegare il cavo parallelo alla stampante e al computer. Collegamento USB (Windows): 1) Inserire il CD di avviamento nell'unità CD-ROM, quindi seguire la procedura di installazione relativa al proprio sistema operativo e al collegamento USB. 2) Quando richiesto dal software di installazione, collegare il cavo USB alla stampante e al computer. 19
-
 1
1 -
2
-
3
-
4
-
5
-
6
-
7
-
8
-
9
-
10
-
11
-
12
-
13
-
 14
14 -
 15
15 -
 16
16 -
 17
17 -
 18
18 -
 19
19 -
 20
20 -
 21
21 -
 22
22 -
 23
23 -
 24
24 -
25
-
26
-
27
-
28
-
29
-
30
-
31
-
32
-
33
-
34
-
35
-
36
-
37
-
38
-
39
-
40
 |
 |
