HP 2300n HP Business Inkjet 2300 - Getting Started Guide - Page 8
Schritt 6: Beschreibung der Bedienfeldteile.
 |
View all HP 2300n manuals
Add to My Manuals
Save this manual to your list of manuals |
Page 8 highlights
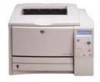
1 2 6 12 3 456 7 8 5 43 9 10 Identify printer parts (back). 1) Parallel port, 2) EIO slot, 3) universal serial bus (USB) port, 4) power input, 5) rear access panel (this panel is removed when installing the optional auto-duplex unit) Step 6: Identify control panel items. 1) Power button, 2) Help button, 3) LCD display, 4) Back button, 5) Up and Down arrow buttons, 6) Select button, 7) Cancel Job button, 8) Resume button, 9) Ready light, 10) Attention light English Deutsch Français Übersicht der Druckerkomponenten (Rückseite). 1) Parallelanschluss, 2) EIO-Steckplatz, 3) USB-Anschluss (Universal Serial Bus), 4) Netzeingang, 5) hintere Zugangsklappe (diese Klappe wird entfernt, wenn die optionale Auto-Duplexeinheit installiert wird) Schritt 6: Beschreibung der Bedienfeldteile. 1) Netzschalter, 2) Hilfe-Taste, 3) LCD-Anzeige, 4) Zurück-Taste, 5) Auf- und Abwärtstasten, 6) Auswahl-Taste, 7) Job-Abbrechen-Taste, 8) Wiederaufnahmetaste, 9) Bereit-LED, 10) Warn-LED Identifiez les éléments de l'imprimante (face arrière). 1) Port parallèle, 2) logement EIO, 3) port USB (Universal Serial Bus), 4) entrée d'alimentation, 5) panneau d'accès arrière (ce panneau est retiré à l'installation de l'unité recto-verso automatique optionnelle) Etape 6 : Identification des composants du panneau de commande. 1) Interrupteur de marche/arrêt, 2) bouton Aide, 3) écran à cristaux liquides, 4) bouton Précédent, 5) boutons Flèche vers le haut et Flèche vers le bas, 6) bouton Select (Sélectionner), 7) bouton Cancel Job (Annuler impression), 8) bouton Reprendre, 9) voyant Prêt, 10) voyant Attention Printeronderdelen controleren (achterkant). 1) Parallelle poort, 2) EIO-sleuf, 3) USB-poort, 4) stroomaansluiting, 5) achterpaneel (dit paneel moet worden verwijderd als u een automatische duplex-eenheid wilt installeren) Stap 6: Onderdelen van het bedieningspaneel controleren. 1) Aan/uit (knop), 2) Help (knop), 3) LCD-scherm, 4) Terug (knop), 5) pijl-omhoog en pijl-omlaag, 6) Selecteren (knop), 7) Taak annuleren (knop), 8) Doorgaan (knop), 9) Klaar (lampje), 10) Attentie (lampje) Identificare le parti della stampante (lato posteriore). 1) Porta parallela, 2) alloggiamento EIO, 3) porta USB, 4) ingresso alimentazione, 5) pannello di accesso posteriore (questo pannello viene rimosso quando si installa l'unità duplex automatico opzionale) Fase 6: Identificare gli elementi del pannello di controllo. 1) pulsante di accensione, 2) pulsante Guida, 3) display a cristalli liquidi, 4) pulsante Indietro, 5) pulsanti freccia su e giù, 6) pulsante di selezione, 7) pulsante di annullamento dell'operazione, 8) pulsante di riavvio, 9) spia Pronta, 10) spia Attenzione 8 Nederlands Italiano
-
 1
1 -
2
-
 3
3 -
 4
4 -
 5
5 -
 6
6 -
 7
7 -
 8
8 -
 9
9 -
 10
10 -
 11
11 -
 12
12 -
 13
13 -
14
-
15
-
16
-
17
-
18
-
19
-
20
-
21
-
22
-
23
-
24
-
25
-
26
-
27
-
28
-
29
-
30
-
31
-
32
-
33
-
34
-
35
-
36
-
37
-
38
-
39
-
40
 |
 |
