HP 3390 HP LaserJet 3050/3052/3055/3390/3392 All-in-One User Guide - Page 346
Alert and warning messages, continued, No fax detected, No paper pickup, to cont., too complex - laserjet scanner error 6
 |
View all HP 3390 manuals
Add to My Manuals
Save this manual to your list of manuals |
Page 346 highlights
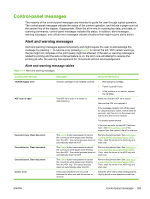
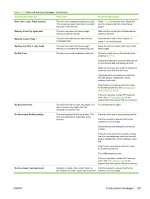
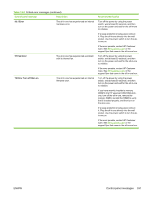
Table 13-1 Alert and warning messages (continued) Control panel message Description Recommended action Check that you are dialing the correct fax number. Check that the redial option is enabled. Unplug the telephone cord from both the allin-one and the wall and replug the cord. Unplug the all-in-one telephone cord from the wall, plug in a telephone, and try making a voice call. Plug the all-in-one phone cord into a jack for another phone line. If the error persists, contact HP Customer Care. See HP Customer Care or the support flyer that came in the all-in-one box. No fax detected The all-in-one answered the incoming call but did not detect that a fax machine was calling. Allow the all-in-one to retry receiving the fax. Try a different phone cord. Plug the all-in-one phone cord into a jack for another phone line. If the error persists, contact HP Customer Care. See HP Customer Care or the support flyer that came in the all-in-one box. No paper pickup to cont. The all-in-one has failed to pick up a piece of media. Verify that the media was inserted far enough into the input tray. In tray 2 (HP LaserJet 3390/3392 all-in-one), verify that the paper-length guide is in the correct position for the media size that you are using. Reload the media in the input tray and press to continue the job. If the error persists, contact HP Customer Care. See HP Customer Care or the support flyer that came in the all-in-one box. Page too complex to cont. The all-in-one could not print the current page because of its complexity. Press to clear the message. Allow the all-in-one to finish the job, or press Cancel to cancel the job. Paper jam in (area) The all-in-one has detected a jam in one of the following areas: tray 1, tray 2, optional tray 3, the registration area, or the fuser. Clear the jam from the area indicated on the all-in-one control panel, and then follow the control panel instructions. See Clearing jams. Scanner reserved for PC scan A computer is using the all-in-one to create a scan. Wait until the computer scan has finished, or cancel the scan from the computer software, or press Cancel. Scanning error Cannot connect The all-in-one cannot transmit scan information to a computer. Verify that the connection cable is not loose or damaged. Replace the cable if necessary, and try the scan again. 328 Chapter 13 Troubleshooting ENWW
-
 1
1 -
2
-
3
-
4
-
5
-
6
-
7
-
8
-
9
-
10
-
11
-
12
-
13
-
14
-
15
-
16
-
17
-
18
-
19
-
20
-
21
-
22
-
23
-
24
-
25
-
26
-
27
-
28
-
29
-
30
-
31
-
32
-
33
-
34
-
35
-
36
-
37
-
38
-
39
-
40
-
41
-
42
-
43
-
44
-
45
-
46
-
47
-
48
-
49
-
50
-
51
-
52
-
53
-
54
-
55
-
56
-
57
-
58
-
59
-
60
-
61
-
62
-
63
-
64
-
65
-
66
-
67
-
68
-
69
-
70
-
71
-
72
-
73
-
74
-
75
-
76
-
77
-
78
-
79
-
80
-
81
-
82
-
83
-
84
-
85
-
86
-
87
-
88
-
89
-
90
-
91
-
92
-
93
-
94
-
95
-
96
-
97
-
98
-
99
-
100
-
101
-
102
-
103
-
104
-
105
-
106
-
107
-
108
-
109
-
110
-
111
-
112
-
113
-
114
-
115
-
116
-
117
-
118
-
119
-
120
-
121
-
122
-
123
-
124
-
125
-
126
-
127
-
128
-
129
-
130
-
131
-
132
-
133
-
134
-
135
-
136
-
137
-
138
-
139
-
140
-
141
-
142
-
143
-
144
-
145
-
146
-
147
-
148
-
149
-
150
-
151
-
152
-
153
-
154
-
155
-
156
-
157
-
158
-
159
-
160
-
161
-
162
-
163
-
164
-
165
-
166
-
167
-
168
-
169
-
170
-
171
-
172
-
173
-
174
-
175
-
176
-
177
-
178
-
179
-
180
-
181
-
182
-
183
-
184
-
185
-
186
-
187
-
188
-
189
-
190
-
191
-
192
-
193
-
194
-
195
-
196
-
197
-
198
-
199
-
200
-
201
-
202
-
203
-
204
-
205
-
206
-
207
-
208
-
209
-
210
-
211
-
212
-
213
-
214
-
215
-
216
-
217
-
218
-
219
-
220
-
221
-
222
-
223
-
224
-
225
-
226
-
227
-
228
-
229
-
230
-
231
-
232
-
233
-
234
-
235
-
236
-
237
-
238
-
239
-
240
-
241
-
242
-
243
-
244
-
245
-
246
-
247
-
248
-
249
-
250
-
251
-
252
-
253
-
254
-
255
-
256
-
257
-
258
-
259
-
260
-
261
-
262
-
263
-
264
-
265
-
266
-
267
-
268
-
269
-
270
-
271
-
272
-
273
-
274
-
275
-
276
-
277
-
278
-
279
-
280
-
281
-
282
-
283
-
284
-
285
-
286
-
287
-
288
-
289
-
290
-
291
-
292
-
293
-
294
-
295
-
296
-
297
-
298
-
299
-
300
-
301
-
302
-
303
-
304
-
305
-
306
-
307
-
308
-
309
-
310
-
311
-
312
-
313
-
314
-
315
-
316
-
317
-
318
-
319
-
320
-
321
-
322
-
323
-
324
-
325
-
326
-
327
-
328
-
329
-
330
-
331
-
332
-
333
-
334
-
335
-
336
-
337
-
338
-
339
-
340
-
 341
341 -
 342
342 -
 343
343 -
 344
344 -
 345
345 -
 346
346 -
 347
347 -
 348
348 -
 349
349 -
 350
350 -
 351
351 -
352
-
353
-
354
-
355
-
356
-
357
-
358
-
359
-
360
-
361
-
362
-
363
-
364
-
365
-
366
-
367
-
368
-
369
-
370
-
371
-
372
-
373
-
374
-
375
-
376
-
377
-
378
-
379
-
380
-
381
-
382
-
383
-
384
-
385
-
386
-
387
-
388
-
389
-
390
-
391
-
392
-
393
-
394
-
395
-
396
-
397
-
398
-
399
-
400
-
401
-
402
-
403
-
404
-
405
-
406
-
407
-
408
-
409
-
410
-
411
-
412
-
413
-
414
-
415
-
416
-
417
-
418
-
419
-
420
-
421
-
422
-
423
-
424
-
425
-
426
-
427
-
428
-
429
-
430
 |
 |
