HP 4000n HP LaserJet 4000 Printer Series - HP LaserJet 4000, 4000 T, 4000 N, a - Page 160
Rotate the cover up towards the, corresponding slots in the printer.
 |
UPC - 008869819917
View all HP 4000n manuals
Add to My Manuals
Save this manual to your list of manuals |
Page 160 highlights
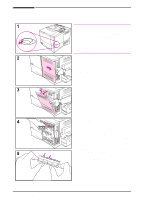
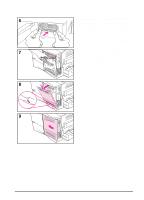
6 Press the DIMM straight into the slot (press firmly). Make sure the locks on each side of the DIMM snap inward into place. (To remove a DIMM, the locks must be released.) 7 Close the DIMM access door and tighten the screw. 8 Set the bottom of the cover onto the printer. Make sure the bottom tabs on the cover fit into the corresponding slots in the printer. Rotate the cover up towards the printer. 9 Slide the cover toward the front of the printer until it clicks into place. Reattach any interface cables and the power cord, then turn the printer on and test the DIMM. (Go to page C-4.) EN Printer Memory and Expansion C-3
-
 1
1 -
2
-
3
-
4
-
5
-
6
-
7
-
8
-
9
-
10
-
11
-
12
-
13
-
14
-
15
-
16
-
17
-
18
-
19
-
20
-
21
-
22
-
23
-
24
-
25
-
26
-
27
-
28
-
29
-
30
-
31
-
32
-
33
-
34
-
35
-
36
-
37
-
38
-
39
-
40
-
41
-
42
-
43
-
44
-
45
-
46
-
47
-
48
-
49
-
50
-
51
-
52
-
53
-
54
-
55
-
56
-
57
-
58
-
59
-
60
-
61
-
62
-
63
-
64
-
65
-
66
-
67
-
68
-
69
-
70
-
71
-
72
-
73
-
74
-
75
-
76
-
77
-
78
-
79
-
80
-
81
-
82
-
83
-
84
-
85
-
86
-
87
-
88
-
89
-
90
-
91
-
92
-
93
-
94
-
95
-
96
-
97
-
98
-
99
-
100
-
101
-
102
-
103
-
104
-
105
-
106
-
107
-
108
-
109
-
110
-
111
-
112
-
113
-
114
-
115
-
116
-
117
-
118
-
119
-
120
-
121
-
122
-
123
-
124
-
125
-
126
-
127
-
128
-
129
-
130
-
131
-
132
-
133
-
134
-
135
-
136
-
137
-
138
-
139
-
140
-
141
-
142
-
143
-
144
-
145
-
146
-
147
-
148
-
149
-
150
-
151
-
152
-
153
-
154
-
 155
155 -
 156
156 -
 157
157 -
 158
158 -
 159
159 -
 160
160 -
 161
161 -
 162
162 -
 163
163 -
 164
164 -
 165
165 -
166
-
167
-
168
-
169
-
170
-
171
-
172
-
173
-
174
-
175
-
176
-
177
-
178
-
179
-
180
-
181
-
182
-
183
-
184
-
185
-
186
-
187
-
188
-
189
-
190
-
191
-
192
-
193
-
194
 |
 |

EN
Printer Memory and Expansion
C-3
6
Press the DIMM straight into the slot
(press firmly). Make sure the locks
on each side of the DIMM snap
inward into place. (To remove a
DIMM, the locks must be released.)
7
Close the DIMM access door and
tighten the screw
.
8
Set the bottom of the cover onto the
printer. Make sure the bottom tabs
on the cover fit into the
corresponding slots in the printer.
Rotate the cover up towards the
printer.
9
Slide the cover toward the front of
the printer until it clicks into place.
Reattach any interface cables and
the power cord, then turn the printer
on and test the DIMM. (Go to
page C-4.)