HP 4240n HP LaserJet 4250/4350 Series - User Guide - Page 115
Setting the date, Setting the time format, CON DEVICE, SYSTEM SETUP, DATE/TIME, MONTH
 |
UPC - 829160883724
View all HP 4240n manuals
Add to My Manuals
Save this manual to your list of manuals |
Page 115 highlights
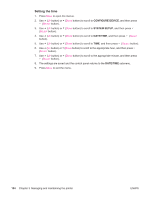
NOTE Setting the date 1. Press MENU to open the menus. 2. Use (UP button) or (DOWN button) to scroll to CONFIGURE DEVICE, and then press (SELECT button). 3. Use (UP button) or (DOWN button) to scroll to SYSTEM SETUP, and then press (SELECT button). 4. Use (UP button) or (DOWN button) to scroll to DATE/TIME, and then press (SELECT button). 5. Use (UP button) or (DOWN button) to scroll to DATE, and then press (SELECT button). 6. Use (UP button) or (DOWN button) to scroll to the appropriate year, and then press (SELECT button). The order of modifying the YEAR, MONTH, and DAY depends upon the date format setting. YEAR, MONTH, or DAY could be the first selection. 7. Use (UP button) or (DOWN button) to scroll to the appropriate month and then press (SELECT button). 8. Use (UP button) or (DOWN button) to scroll to the appropriate day and then press (SELECT button). 9. The settings are saved and the control panel returns to the DATE/TIME submenu. 10. Press MENU to exit the menu. Setting the time format 1. Press MENU to open the menus. 2. Use (UP button) or (DOWN button) to scroll to CONFIGURE DEVICE, and then press (SELECT button). 3. Use (UP button) or (DOWN button) to scroll to SYSTEM SETUP, and then press (SELECT button). 4. Use (UP button) or (DOWN button) to scroll to DATE/TIME, and then press (SELECT button). 5. Use (UP button) or (DOWN button) to scroll to TIME FORMAT, and then press (SELECT button). 6. Use (UP button) or (DOWN button) to scroll to the desired time format, and then press (SELECT button). 7. The settings are saved and the control panel returns to the DATE/TIME submenu. 8. Press MENU to exit the menu. ENWW Setting the real-time clock 103
-
 1
1 -
2
-
3
-
4
-
5
-
6
-
7
-
8
-
9
-
10
-
11
-
12
-
13
-
14
-
15
-
16
-
17
-
18
-
19
-
20
-
21
-
22
-
23
-
24
-
25
-
26
-
27
-
28
-
29
-
30
-
31
-
32
-
33
-
34
-
35
-
36
-
37
-
38
-
39
-
40
-
41
-
42
-
43
-
44
-
45
-
46
-
47
-
48
-
49
-
50
-
51
-
52
-
53
-
54
-
55
-
56
-
57
-
58
-
59
-
60
-
61
-
62
-
63
-
64
-
65
-
66
-
67
-
68
-
69
-
70
-
71
-
72
-
73
-
74
-
75
-
76
-
77
-
78
-
79
-
80
-
81
-
82
-
83
-
84
-
85
-
86
-
87
-
88
-
89
-
90
-
91
-
92
-
93
-
94
-
95
-
96
-
97
-
98
-
99
-
100
-
101
-
102
-
103
-
104
-
105
-
106
-
107
-
108
-
109
-
 110
110 -
 111
111 -
 112
112 -
 113
113 -
 114
114 -
 115
115 -
 116
116 -
 117
117 -
 118
118 -
 119
119 -
 120
120 -
121
-
122
-
123
-
124
-
125
-
126
-
127
-
128
-
129
-
130
-
131
-
132
-
133
-
134
-
135
-
136
-
137
-
138
-
139
-
140
-
141
-
142
-
143
-
144
-
145
-
146
-
147
-
148
-
149
-
150
-
151
-
152
-
153
-
154
-
155
-
156
-
157
-
158
-
159
-
160
-
161
-
162
-
163
-
164
-
165
-
166
-
167
-
168
-
169
-
170
-
171
-
172
-
173
-
174
-
175
-
176
-
177
-
178
-
179
-
180
-
181
-
182
-
183
-
184
-
185
-
186
-
187
-
188
-
189
-
190
-
191
-
192
-
193
-
194
-
195
-
196
-
197
-
198
-
199
-
200
-
201
-
202
-
203
-
204
-
205
-
206
-
207
-
208
-
209
-
210
-
211
-
212
-
213
-
214
-
215
-
216
-
217
-
218
-
219
-
220
-
221
-
222
-
223
-
224
-
225
-
226
-
227
-
228
-
229
-
230
-
231
-
232
-
233
-
234
-
235
-
236
-
237
-
238
-
239
-
240
-
241
-
242
-
243
-
244
-
245
-
246
-
247
-
248
-
249
-
250
-
251
-
252
-
253
-
254
-
255
-
256
-
257
-
258
-
259
-
260
-
261
-
262
-
263
-
264
-
265
-
266
-
267
-
268
-
269
-
270
-
271
-
272
-
273
-
274
-
275
-
276
-
277
-
278
-
279
-
280
-
281
-
282
-
283
-
284
-
285
-
286
-
287
-
288
-
289
-
290
-
291
-
292
-
293
-
294
-
295
-
296
-
297
-
298
-
299
-
300
-
301
-
302
-
303
-
304
 |
 |
