HP 4240n HP LaserJet 4250/4350 Series - User Guide - Page 45
Installing Macintosh printing system software for networks, PostScript Printer Description files - laserjet printer driver
 |
UPC - 829160883724
View all HP 4240n manuals
Add to My Manuals
Save this manual to your list of manuals |
Page 45 highlights
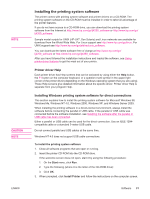
To set up a Windows computer to use the network printer with Windows-sharing You can share the printer on the network so that other network users can print to it. See your Windows documentation to set up Windows-sharing. After the printer is shared, install the printer software on all computers that share the printer. Installing Macintosh printing system software for networks This section describes how to install Macintosh printing system software. The printing system software supports Apple Mac OS 9.x and later and OS X V10.1 and later. The printing system software includes the following components: ● PostScript Printer Description files. The PostScript (PS) Printer Description files (PPDs), in combination with the Apple LaserWriter 8 printer driver, provide access to the printer features and allow the computer to communicate with the printer. An installation program for the PPDs and other software is provided on the CD-ROM that came with the printer. In addition, use the Apple LaserWriter 8 printer driver that comes with the computer. ● HP LaserJet Utility. The HP LaserJet Utility provides access to features that are not available in the printer driver. Use the illustrated screens to select printer features and complete tasks with the printer: - Name the printer, assign it to a zone on the network, download files and fonts, and change many of the printer settings. - Set a password for the printer. - Check the levels of printer consumables. - Configure and set the printer for Internet Protocol (IP) or AppleTalk printing. To install printer drivers in Mac OS 9.x 1. Connect the network cable between the HP Jetdirect print server and a network port. 2. Insert the CD-ROM into the CD-ROM drive. The CD-ROM menu runs automatically. If the CD-ROM menu does not run automatically, double-click the CD-ROM icon on the desktop, and then double-click the Installer icon. This icon is located in the Installer/ folder of the Starter CD-ROM, where is your language preference. For example, the Installer/English folder contains the Installer icon for the English printer software. 3. Follow the instructions on the screen. 4. From HD, click Applications, click Utilities, and then open the Apple Desktop Printer Utility. 5. Double click Printer (AppleTalk). 6. Next to AppleTalk Printer Selection, click Change. 7. Select the printer, click Auto Setup, and then click Create. 8. On the Printing menu, click Set Default Printer. To install printer drivers in Mac OS X V10.1 and later 1. Connect the network cable between the HP Jetdirect print server and a network port. ENWW Software 33
-
 1
1 -
2
-
3
-
4
-
5
-
6
-
7
-
8
-
9
-
10
-
11
-
12
-
13
-
14
-
15
-
16
-
17
-
18
-
19
-
20
-
21
-
22
-
23
-
24
-
25
-
26
-
27
-
28
-
29
-
30
-
31
-
32
-
33
-
34
-
35
-
36
-
37
-
38
-
39
-
 40
40 -
 41
41 -
 42
42 -
 43
43 -
 44
44 -
 45
45 -
 46
46 -
 47
47 -
 48
48 -
 49
49 -
 50
50 -
51
-
52
-
53
-
54
-
55
-
56
-
57
-
58
-
59
-
60
-
61
-
62
-
63
-
64
-
65
-
66
-
67
-
68
-
69
-
70
-
71
-
72
-
73
-
74
-
75
-
76
-
77
-
78
-
79
-
80
-
81
-
82
-
83
-
84
-
85
-
86
-
87
-
88
-
89
-
90
-
91
-
92
-
93
-
94
-
95
-
96
-
97
-
98
-
99
-
100
-
101
-
102
-
103
-
104
-
105
-
106
-
107
-
108
-
109
-
110
-
111
-
112
-
113
-
114
-
115
-
116
-
117
-
118
-
119
-
120
-
121
-
122
-
123
-
124
-
125
-
126
-
127
-
128
-
129
-
130
-
131
-
132
-
133
-
134
-
135
-
136
-
137
-
138
-
139
-
140
-
141
-
142
-
143
-
144
-
145
-
146
-
147
-
148
-
149
-
150
-
151
-
152
-
153
-
154
-
155
-
156
-
157
-
158
-
159
-
160
-
161
-
162
-
163
-
164
-
165
-
166
-
167
-
168
-
169
-
170
-
171
-
172
-
173
-
174
-
175
-
176
-
177
-
178
-
179
-
180
-
181
-
182
-
183
-
184
-
185
-
186
-
187
-
188
-
189
-
190
-
191
-
192
-
193
-
194
-
195
-
196
-
197
-
198
-
199
-
200
-
201
-
202
-
203
-
204
-
205
-
206
-
207
-
208
-
209
-
210
-
211
-
212
-
213
-
214
-
215
-
216
-
217
-
218
-
219
-
220
-
221
-
222
-
223
-
224
-
225
-
226
-
227
-
228
-
229
-
230
-
231
-
232
-
233
-
234
-
235
-
236
-
237
-
238
-
239
-
240
-
241
-
242
-
243
-
244
-
245
-
246
-
247
-
248
-
249
-
250
-
251
-
252
-
253
-
254
-
255
-
256
-
257
-
258
-
259
-
260
-
261
-
262
-
263
-
264
-
265
-
266
-
267
-
268
-
269
-
270
-
271
-
272
-
273
-
274
-
275
-
276
-
277
-
278
-
279
-
280
-
281
-
282
-
283
-
284
-
285
-
286
-
287
-
288
-
289
-
290
-
291
-
292
-
293
-
294
-
295
-
296
-
297
-
298
-
299
-
300
-
301
-
302
-
303
-
304
 |
 |
