HP 4240n HP LaserJet 4250/4350 Series - User Guide - Page 48
Uninstalling the software, To remove software from Windows operating systems - laserjet windows 7
 |
UPC - 829160883724
View all HP 4240n manuals
Add to My Manuals
Save this manual to your list of manuals |
Page 48 highlights
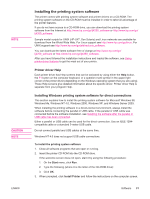
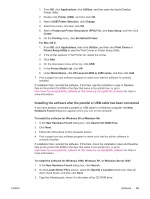
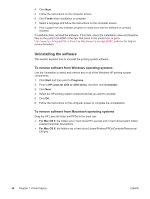
4. Click Next. 5. Follow the instructions on the computer screen. 6. Click Finish when installation is complete. 7. Select a language and follow the instructions on the computer screen. 8. Print a page from any software program to make sure that the software is correctly installed. If installation fails, reinstall the software. If this fails, check the installation notes and Readme files on the printer CD-ROM or the flyer that came in the printer box, or go to http://www.hp.com/go/lj4250_software or http://www.hp.com/go/lj4350_software for help or more information. Uninstalling the software This section explains how to uninstall the printing system software. To remove software from Windows operating systems Use the Uninstaller to select and remove any or all of the Windows HP printing-system components. 1. Click Start and then point to Programs. 2. Point to HP LaserJet 4250 or 4350 series, and then click Uninstaller. 3. Click Next. 4. Select the HP printing-system components that you want to uninstall. 5. Click OK. 6. Follow the instructions on the computer screen to complete the uninstallation. To remove software from Macintosh operating systems Drag the HP LaserJet folder and PPDs to the trash can: ● For Mac OS 9, the folders are in hard drive/HP LaserJet and in hard drive/system folder/ extensions/printer descriptions. ● For Mac OS X, the folders are in hard drive/Library/Printers/PPDs/Contents/Resources/ EN.lproj. 36 Chapter 1 Printer basics ENWW
-
 1
1 -
2
-
3
-
4
-
5
-
6
-
7
-
8
-
9
-
10
-
11
-
12
-
13
-
14
-
15
-
16
-
17
-
18
-
19
-
20
-
21
-
22
-
23
-
24
-
25
-
26
-
27
-
28
-
29
-
30
-
31
-
32
-
33
-
34
-
35
-
36
-
37
-
38
-
39
-
40
-
41
-
42
-
 43
43 -
 44
44 -
 45
45 -
 46
46 -
 47
47 -
 48
48 -
 49
49 -
 50
50 -
 51
51 -
 52
52 -
 53
53 -
54
-
55
-
56
-
57
-
58
-
59
-
60
-
61
-
62
-
63
-
64
-
65
-
66
-
67
-
68
-
69
-
70
-
71
-
72
-
73
-
74
-
75
-
76
-
77
-
78
-
79
-
80
-
81
-
82
-
83
-
84
-
85
-
86
-
87
-
88
-
89
-
90
-
91
-
92
-
93
-
94
-
95
-
96
-
97
-
98
-
99
-
100
-
101
-
102
-
103
-
104
-
105
-
106
-
107
-
108
-
109
-
110
-
111
-
112
-
113
-
114
-
115
-
116
-
117
-
118
-
119
-
120
-
121
-
122
-
123
-
124
-
125
-
126
-
127
-
128
-
129
-
130
-
131
-
132
-
133
-
134
-
135
-
136
-
137
-
138
-
139
-
140
-
141
-
142
-
143
-
144
-
145
-
146
-
147
-
148
-
149
-
150
-
151
-
152
-
153
-
154
-
155
-
156
-
157
-
158
-
159
-
160
-
161
-
162
-
163
-
164
-
165
-
166
-
167
-
168
-
169
-
170
-
171
-
172
-
173
-
174
-
175
-
176
-
177
-
178
-
179
-
180
-
181
-
182
-
183
-
184
-
185
-
186
-
187
-
188
-
189
-
190
-
191
-
192
-
193
-
194
-
195
-
196
-
197
-
198
-
199
-
200
-
201
-
202
-
203
-
204
-
205
-
206
-
207
-
208
-
209
-
210
-
211
-
212
-
213
-
214
-
215
-
216
-
217
-
218
-
219
-
220
-
221
-
222
-
223
-
224
-
225
-
226
-
227
-
228
-
229
-
230
-
231
-
232
-
233
-
234
-
235
-
236
-
237
-
238
-
239
-
240
-
241
-
242
-
243
-
244
-
245
-
246
-
247
-
248
-
249
-
250
-
251
-
252
-
253
-
254
-
255
-
256
-
257
-
258
-
259
-
260
-
261
-
262
-
263
-
264
-
265
-
266
-
267
-
268
-
269
-
270
-
271
-
272
-
273
-
274
-
275
-
276
-
277
-
278
-
279
-
280
-
281
-
282
-
283
-
284
-
285
-
286
-
287
-
288
-
289
-
290
-
291
-
292
-
293
-
294
-
295
-
296
-
297
-
298
-
299
-
300
-
301
-
302
-
303
-
304
 |
 |