HP 4240n HP LaserJet 4250/4350 Series - User Guide - Page 64
To load tray 2 or an optional 500-sheet tray, On the right side of the tray
 |
UPC - 829160883724
View all HP 4240n manuals
Add to My Manuals
Save this manual to your list of manuals |
Page 64 highlights
To load tray 2 or an optional 500-sheet tray 1. Pull the tray out and lift up slightly to remove it from the printer. 2. Pinch the release that is located on the left guide and slide the side guides to the correct paper size. 3. Pinch the release that is located on the rear paper guide and slide it to the correct media size. 4. On the right side of the tray, turn the knob to Standard for LTR (letter), A4, LGL (legal), EXEC (executive), A5, or JIS B5 paper. Turn the knob to Custom for supported custom paper sizes. 2 1 1 Standard position 2 Custom position 52 Chapter 2 Printing tasks ENWW
-
 1
1 -
2
-
3
-
4
-
5
-
6
-
7
-
8
-
9
-
10
-
11
-
12
-
13
-
14
-
15
-
16
-
17
-
18
-
19
-
20
-
21
-
22
-
23
-
24
-
25
-
26
-
27
-
28
-
29
-
30
-
31
-
32
-
33
-
34
-
35
-
36
-
37
-
38
-
39
-
40
-
41
-
42
-
43
-
44
-
45
-
46
-
47
-
48
-
49
-
50
-
51
-
52
-
53
-
54
-
55
-
56
-
57
-
58
-
 59
59 -
 60
60 -
 61
61 -
 62
62 -
 63
63 -
 64
64 -
 65
65 -
 66
66 -
 67
67 -
 68
68 -
 69
69 -
70
-
71
-
72
-
73
-
74
-
75
-
76
-
77
-
78
-
79
-
80
-
81
-
82
-
83
-
84
-
85
-
86
-
87
-
88
-
89
-
90
-
91
-
92
-
93
-
94
-
95
-
96
-
97
-
98
-
99
-
100
-
101
-
102
-
103
-
104
-
105
-
106
-
107
-
108
-
109
-
110
-
111
-
112
-
113
-
114
-
115
-
116
-
117
-
118
-
119
-
120
-
121
-
122
-
123
-
124
-
125
-
126
-
127
-
128
-
129
-
130
-
131
-
132
-
133
-
134
-
135
-
136
-
137
-
138
-
139
-
140
-
141
-
142
-
143
-
144
-
145
-
146
-
147
-
148
-
149
-
150
-
151
-
152
-
153
-
154
-
155
-
156
-
157
-
158
-
159
-
160
-
161
-
162
-
163
-
164
-
165
-
166
-
167
-
168
-
169
-
170
-
171
-
172
-
173
-
174
-
175
-
176
-
177
-
178
-
179
-
180
-
181
-
182
-
183
-
184
-
185
-
186
-
187
-
188
-
189
-
190
-
191
-
192
-
193
-
194
-
195
-
196
-
197
-
198
-
199
-
200
-
201
-
202
-
203
-
204
-
205
-
206
-
207
-
208
-
209
-
210
-
211
-
212
-
213
-
214
-
215
-
216
-
217
-
218
-
219
-
220
-
221
-
222
-
223
-
224
-
225
-
226
-
227
-
228
-
229
-
230
-
231
-
232
-
233
-
234
-
235
-
236
-
237
-
238
-
239
-
240
-
241
-
242
-
243
-
244
-
245
-
246
-
247
-
248
-
249
-
250
-
251
-
252
-
253
-
254
-
255
-
256
-
257
-
258
-
259
-
260
-
261
-
262
-
263
-
264
-
265
-
266
-
267
-
268
-
269
-
270
-
271
-
272
-
273
-
274
-
275
-
276
-
277
-
278
-
279
-
280
-
281
-
282
-
283
-
284
-
285
-
286
-
287
-
288
-
289
-
290
-
291
-
292
-
293
-
294
-
295
-
296
-
297
-
298
-
299
-
300
-
301
-
302
-
303
-
304
 |
 |

To load tray 2 or an optional 500-sheet tray
1.
Pull the tray out and lift up slightly to remove it from the printer.
2.
Pinch the release that is located on the left guide and slide the side guides to the correct
paper size.
3.
Pinch the release that is located on the rear paper guide and slide it to the correct media
size.
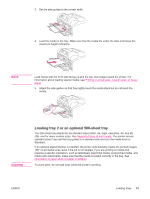
4.
On the right side of the tray, turn the knob to Standard for LTR (letter), A4, LGL (legal),
EXEC (executive), A5, or JIS B5 paper. Turn the knob to Custom for supported custom
paper sizes.
2
1
1
Standard position
2
Custom position
52
Chapter 2
Printing tasks
ENWW