HP 9110 HP Officejet 9100 - User Guide - Page 19
Right side of the control panel, Switches between black-and-white and color.
 |
UPC - 829160117492
View all HP 9110 manuals
Add to My Manuals
Save this manual to your list of manuals |
Page 19 highlights
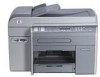
Right side of the control panel 1 2 34 5 6 7 11 10 9 8 1 Keypad Use to dial fax numbers or type text. The text that you type is inserted (it does not overwrite characters that are to the right of the cursor). See Typing numbers and text on the control-panel keypad for more information. 2 (backspace) button 3 RESET/HOLD FOR PIN button Returns the all-in-one to the READY state; this resets all modes to their default values. If the administrator has configured the all-in-one for users, holding the button down for 2 seconds or more locks the all-in-one. A personal identification number (PIN) is then required to resume operation. 4 POWER button and Ready light The Ready light is green when the all-in-one is on. 5 STOP button 6 BLACK/COLOR button Switches between black-and-white and color. 7 START button Starts a job in a mode after you have configured settings. 8 (off-hook) light Lights when the fax line is in use, and blinks when the fax line is ringing. 9 REDIAL/ANSWER button • Redials the most recently dialed fax number when the all-in-one is in the READY state. • Answers the phone manually for an incoming fax. 10 PAUSE / (space) button 11 SYMBOLS button ENWW Understanding the all-in-one parts 17
-
 1
1 -
2
-
3
-
4
-
5
-
6
-
7
-
8
-
9
-
10
-
11
-
12
-
13
-
 14
14 -
 15
15 -
 16
16 -
 17
17 -
 18
18 -
 19
19 -
 20
20 -
 21
21 -
 22
22 -
 23
23 -
 24
24 -
25
-
26
-
27
-
28
-
29
-
30
-
31
-
32
-
33
-
34
-
35
-
36
-
37
-
38
-
39
-
40
-
41
-
42
-
43
-
44
-
45
-
46
-
47
-
48
-
49
-
50
-
51
-
52
-
53
-
54
-
55
-
56
-
57
-
58
-
59
-
60
-
61
-
62
-
63
-
64
-
65
-
66
-
67
-
68
-
69
-
70
-
71
-
72
-
73
-
74
-
75
-
76
-
77
-
78
-
79
-
80
-
81
-
82
-
83
-
84
-
85
-
86
-
87
-
88
-
89
-
90
-
91
-
92
-
93
-
94
-
95
-
96
-
97
-
98
-
99
-
100
-
101
-
102
-
103
-
104
-
105
-
106
-
107
-
108
-
109
-
110
-
111
-
112
-
113
-
114
-
115
-
116
-
117
-
118
-
119
-
120
-
121
-
122
-
123
-
124
-
125
-
126
-
127
-
128
-
129
-
130
-
131
-
132
-
133
-
134
-
135
-
136
-
137
-
138
-
139
-
140
-
141
-
142
-
143
-
144
-
145
-
146
-
147
-
148
-
149
-
150
-
151
-
152
-
153
-
154
-
155
-
156
-
157
-
158
-
159
-
160
-
161
-
162
-
163
-
164
-
165
-
166
-
167
-
168
-
169
-
170
-
171
-
172
-
173
-
174
-
175
-
176
-
177
-
178
-
179
-
180
-
181
-
182
-
183
-
184
-
185
-
186
-
187
-
188
-
189
-
190
-
191
-
192
-
193
-
194
-
195
-
196
-
197
-
198
-
199
-
200
-
201
-
202
-
203
-
204
-
205
-
206
-
207
-
208
-
209
-
210
-
211
-
212
-
213
-
214
-
215
-
216
-
217
-
218
-
219
-
220
-
221
-
222
-
223
-
224
-
225
-
226
-
227
-
228
-
229
-
230
-
231
-
232
-
233
-
234
-
235
-
236
-
237
-
238
-
239
-
240
-
241
-
242
-
243
-
244
-
245
-
246
-
247
-
248
-
249
-
250
-
251
-
252
-
253
-
254
-
255
-
256
-
257
-
258
-
259
-
260
-
261
-
262
-
263
-
264
-
265
-
266
-
267
-
268
-
269
-
270
-
271
-
272
-
273
-
274
-
275
-
276
-
277
-
278
-
279
-
280
 |
 |