HP A7217A hp 24'' monitor - a7217a, user's guide - Page 14
Adjusting the quality of the picture (SCREEN), Restoring the color from the EASY or sRGB menus
 |
UPC - 808736305884
View all HP A7217A manuals
Add to My Manuals
Save this manual to your list of manuals |
Page 14 highlights
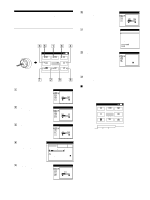
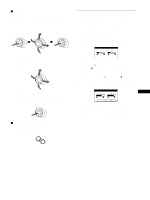
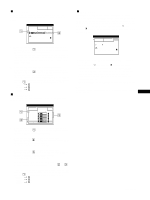
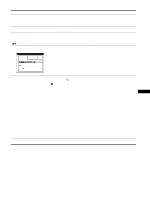
Restoring the color from the EASY or sRGB menus (IMAGE RESTORATION function) The colors of most display monitors tend to gradually lose brilliance over several years of service. The IMAGE RESTORATION feature found in the EASY and sRGB menus allows you to restore the color to the original factory quality levels. 1 Move the joystick left or right to select EASY or sRGB mode. 2 First move the joystick up or down to select (IMAGE RESTORATION). Then move the joystick to the right. The picture disappears while the color is being restored (about 2 seconds). After the color is restored, the picture reappears on the screen again. Notes • Before using this feature, the monitor must be in normal operation mode (green power indicator on) for at least 30 minutes. If the monitor goes into power saving mode, you must return the monitor to normal operation mode and wait for 30 minutes for the monitor to be ready. You may need to adjust your computer's power saving settings to keep the monitor in normal operation mode for the full 30 minutes. If the monitor is not ready, the following message will appear. CO L OR EASY EXPERT s RGB 5000K 6500K 9300K 5000K I MAGE RES TORA T I ON AVA I LABLE A F T ER WARM UP • The monitor may gradually lose its ability to perform this function due to the natural aging of the picture tube. Adjusting the quality of the picture (SCREEN) The SCREEN settings allow you to adjust the quality of the picture by controlling the moire and landing. • If the color is irregular at the corners of the screen, adjust the landing. • If elliptical or wavy patterns appear on the screen, cancel the moire. The CANCEL MOIRE and MOIRE ADJUST settings are stored in memory for the current input signal. All other settings are stored in memory for all input signals. 1 Press the joystick. The main MENU appears on the screen. 2 Move the joystick to highlight SCREEN and press the joystick again. The SCREEN menu appears on the screen. 3 First move the joystick up or down to select the desired adjustment item. Then move the joystick left or right to make the adjustment. Select LANDING LANDING LANDING LANDING CANCEL MOIRE* MOIRE ADJUST To reduce any color irregularities in the screen's top left corner to a minimum. reduce any color irregularities in the screen's top right corner to a minimum. reduce any color irregularities in the screen's bottom left corner to a minimum. reduce any color irregularities in the screen's bottom right corner to a minimum. turn the moire cancellation function ON or OFF. (MOIRE ADJUST) appears in the menu when you select ON. adjust the degree of moire cancellation until the moire is at a minimum. * Moire is a type of natural interference which produces soft, wavy lines on your screen. It may appear due to interference between the pattern of the picture on the screen and the phosphor pitch pattern of the monitor. Example of moire Note The picture may become fuzzy when CANCEL MOIRE is set to ON. 14
-
 1
1 -
2
-
3
-
4
-
5
-
6
-
7
-
8
-
 9
9 -
 10
10 -
 11
11 -
 12
12 -
 13
13 -
 14
14 -
 15
15 -
 16
16 -
 17
17 -
 18
18 -
 19
19 -
20
-
21
-
22
-
23
-
24
-
25
-
26
-
27
-
28
-
29
-
30
-
31
-
32
-
33
-
34
-
35
-
36
-
37
-
38
-
39
-
40
-
41
-
42
-
43
-
44
-
45
-
46
-
47
-
48
-
49
-
50
-
51
-
52
-
53
-
54
-
55
-
56
-
57
-
58
-
59
-
60
-
61
-
62
-
63
-
64
-
65
-
66
-
67
-
68
-
69
-
70
-
71
-
72
-
73
-
74
-
75
-
76
-
77
-
78
-
79
-
80
-
81
-
82
-
83
-
84
-
85
-
86
-
87
-
88
-
89
-
90
-
91
-
92
-
93
-
94
-
95
-
96
-
97
-
98
-
99
-
100
-
101
-
102
-
103
-
104
-
105
-
106
-
107
-
108
-
109
-
110
-
111
-
112
-
113
-
114
-
115
-
116
-
117
-
118
-
119
-
120
-
121
-
122
-
123
-
124
-
125
-
126
-
127
-
128
-
129
-
130
-
131
-
132
 |
 |