HP AE370A HP StorageWorks Fabric OS 6.2 administrator guide (5697-0016, May 20 - Page 535
Basic procedure for changing the PID format
 |
UPC - 882780362611
View all HP AE370A manuals
Add to My Manuals
Save this manual to your list of manuals |
Page 535 highlights
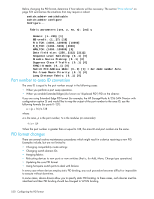
The following sections contain a basic procedure that summarizes the steps necessary to perform PID format changes without disrupting the fabric, and special procedures for HP/UX and AIX. Basic procedure for changing the PID format This process should be executed as part of the overall online or offline update process. However, it can be implemented in a stand-alone manner on a non-production fabric, or a switch that has not yet joined a fabric. 1. Ensure that all switches in the fabric are running one of the Fabric OS versions listed below that support the addressing mode: • HP StorageWorks SAN Switch 2/8-EL and HP StorageWorks SAN Switch 2/16-3.1.2 or later • HP StorageWorks SAN Switch 2/8V, HP StorageWorks SAN Switch 2/16V, HP StorageWorks SAN Switch 2/32, HP StorageWorks Core Switch 2/64, HP StorageWorks SAN Director 2/128-5.3.0 or later • Brocade 4Gb SAN Switch for HP p-Class BladeSystem-5.0.0 or later • HP StorageWorks 4/8 and 4/16 SAN Switches, HP StorageWorks 4/256 SAN Director-5.3.0 or later • HP StorageWorks 4/64 SAN Switch, HP StorageWorks 400 Multi-Protocol Router or HP StorageWorks 4/256 SAN Director with a B-Series Multi-Protocol Router Blade-5.3.0 or later NOTE: All switches running any version of Fabric OS 4.0.0 and later are shipped with the Core Switch PID Format enabled, so it is not necessary to perform the PID format change on these switches. 2. Telnet into one of the switches in the fabric. 3. Enter the switchDisable command to disable the switch. 4. Enter the configure command (the configure prompts display sequentially). 5. Enter y after the Fabric parameters prompt. 6. Enter 1 at the Core Switch PID Format prompt. 7. Respond to the remaining prompts or press Ctrl-d to accept the remaining settings without responding to all the prompts. 8. Repeat steps 2 through 7 for the remaining switches in the fabric. 9. Enter the switchEnable command to re-enable the switch. For example: switch:admin> switchdisable switch:admin> configure Configure... Fabric parameters (yes, y, no, n): [no] yes Domain: (1..239) [1] R_A_TOV: (4000..120000) [10000] E_D_TOV: (1000..5000) [2000] Data field size: (256..2112) [2112] Sequence Level Switching: (0..1) [0] Disable Device Probing: (0..1) [0] Suppress Class F Traffic: (0..1) [0] SYNC IO mode: (0..1) [0] Core Switch PID Format: (0..2) [0] 1 Per-frame Route Priority: (0..1) [0] Long Distance Fabric: (0..1) [0] BB credit: (1..27) [16] 10. After all switches are updated to use the new PID format and re-enabled, verify that the fabric has fully reconverged. Each switch can communicate with other switches in the fabric and no segmentation has occurred. 11. Enter the cfgEnable active_config_name command on one of the switches in the fabric to update zoning to use the new PID form. This does not change the definition of zones in the fabric; it causes the lowest level tables in the zoning database to be updated with the new PID format setting. It is necessary to do this only once per fabric; the zoning update automatically propagates to all switches. Fabric OS 6.2 administrator guide 531
-
 1
1 -
2
-
3
-
4
-
5
-
6
-
7
-
8
-
9
-
10
-
11
-
12
-
13
-
14
-
15
-
16
-
17
-
18
-
19
-
20
-
21
-
22
-
23
-
24
-
25
-
26
-
27
-
28
-
29
-
30
-
31
-
32
-
33
-
34
-
35
-
36
-
37
-
38
-
39
-
40
-
41
-
42
-
43
-
44
-
45
-
46
-
47
-
48
-
49
-
50
-
51
-
52
-
53
-
54
-
55
-
56
-
57
-
58
-
59
-
60
-
61
-
62
-
63
-
64
-
65
-
66
-
67
-
68
-
69
-
70
-
71
-
72
-
73
-
74
-
75
-
76
-
77
-
78
-
79
-
80
-
81
-
82
-
83
-
84
-
85
-
86
-
87
-
88
-
89
-
90
-
91
-
92
-
93
-
94
-
95
-
96
-
97
-
98
-
99
-
100
-
101
-
102
-
103
-
104
-
105
-
106
-
107
-
108
-
109
-
110
-
111
-
112
-
113
-
114
-
115
-
116
-
117
-
118
-
119
-
120
-
121
-
122
-
123
-
124
-
125
-
126
-
127
-
128
-
129
-
130
-
131
-
132
-
133
-
134
-
135
-
136
-
137
-
138
-
139
-
140
-
141
-
142
-
143
-
144
-
145
-
146
-
147
-
148
-
149
-
150
-
151
-
152
-
153
-
154
-
155
-
156
-
157
-
158
-
159
-
160
-
161
-
162
-
163
-
164
-
165
-
166
-
167
-
168
-
169
-
170
-
171
-
172
-
173
-
174
-
175
-
176
-
177
-
178
-
179
-
180
-
181
-
182
-
183
-
184
-
185
-
186
-
187
-
188
-
189
-
190
-
191
-
192
-
193
-
194
-
195
-
196
-
197
-
198
-
199
-
200
-
201
-
202
-
203
-
204
-
205
-
206
-
207
-
208
-
209
-
210
-
211
-
212
-
213
-
214
-
215
-
216
-
217
-
218
-
219
-
220
-
221
-
222
-
223
-
224
-
225
-
226
-
227
-
228
-
229
-
230
-
231
-
232
-
233
-
234
-
235
-
236
-
237
-
238
-
239
-
240
-
241
-
242
-
243
-
244
-
245
-
246
-
247
-
248
-
249
-
250
-
251
-
252
-
253
-
254
-
255
-
256
-
257
-
258
-
259
-
260
-
261
-
262
-
263
-
264
-
265
-
266
-
267
-
268
-
269
-
270
-
271
-
272
-
273
-
274
-
275
-
276
-
277
-
278
-
279
-
280
-
281
-
282
-
283
-
284
-
285
-
286
-
287
-
288
-
289
-
290
-
291
-
292
-
293
-
294
-
295
-
296
-
297
-
298
-
299
-
300
-
301
-
302
-
303
-
304
-
305
-
306
-
307
-
308
-
309
-
310
-
311
-
312
-
313
-
314
-
315
-
316
-
317
-
318
-
319
-
320
-
321
-
322
-
323
-
324
-
325
-
326
-
327
-
328
-
329
-
330
-
331
-
332
-
333
-
334
-
335
-
336
-
337
-
338
-
339
-
340
-
341
-
342
-
343
-
344
-
345
-
346
-
347
-
348
-
349
-
350
-
351
-
352
-
353
-
354
-
355
-
356
-
357
-
358
-
359
-
360
-
361
-
362
-
363
-
364
-
365
-
366
-
367
-
368
-
369
-
370
-
371
-
372
-
373
-
374
-
375
-
376
-
377
-
378
-
379
-
380
-
381
-
382
-
383
-
384
-
385
-
386
-
387
-
388
-
389
-
390
-
391
-
392
-
393
-
394
-
395
-
396
-
397
-
398
-
399
-
400
-
401
-
402
-
403
-
404
-
405
-
406
-
407
-
408
-
409
-
410
-
411
-
412
-
413
-
414
-
415
-
416
-
417
-
418
-
419
-
420
-
421
-
422
-
423
-
424
-
425
-
426
-
427
-
428
-
429
-
430
-
431
-
432
-
433
-
434
-
435
-
436
-
437
-
438
-
439
-
440
-
441
-
442
-
443
-
444
-
445
-
446
-
447
-
448
-
449
-
450
-
451
-
452
-
453
-
454
-
455
-
456
-
457
-
458
-
459
-
460
-
461
-
462
-
463
-
464
-
465
-
466
-
467
-
468
-
469
-
470
-
471
-
472
-
473
-
474
-
475
-
476
-
477
-
478
-
479
-
480
-
481
-
482
-
483
-
484
-
485
-
486
-
487
-
488
-
489
-
490
-
491
-
492
-
493
-
494
-
495
-
496
-
497
-
498
-
499
-
500
-
501
-
502
-
503
-
504
-
505
-
506
-
507
-
508
-
509
-
510
-
511
-
512
-
513
-
514
-
515
-
516
-
517
-
518
-
519
-
520
-
521
-
522
-
523
-
524
-
525
-
526
-
527
-
528
-
529
-
 530
530 -
 531
531 -
 532
532 -
 533
533 -
 534
534 -
 535
535 -
 536
536 -
 537
537 -
 538
538 -
 539
539 -
 540
540 -
541
-
542
-
543
-
544
-
545
-
546
-
547
-
548
-
549
-
550
-
551
-
552
-
553
-
554
-
555
-
556
-
557
-
558
-
559
-
560
-
561
-
562
-
563
-
564
-
565
-
566
-
567
-
568
-
569
-
570
-
571
-
572
-
573
-
574
-
575
-
576
 |
 |
