HP B8550 User Guide - Page 16
Maintain the HP Photosmart, Work with ink cartridges and the printhead, Information on ink - photosmart printhead
 |
UPC - 884420048510
View all HP B8550 manuals
Add to My Manuals
Save this manual to your list of manuals |
Page 16 highlights
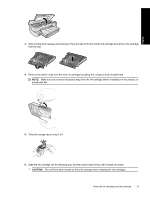
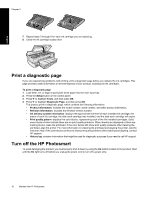
English 2 Maintain the HP Photosmart The HP Photosmart requires little maintenance. You might need to replace ink cartridges, clean the printhead, or align the printer from time to time. This section provides instructions for keeping the HP Photosmart in top working condition. Perform these simple maintenance procedures as necessary. Work with ink cartridges and the printhead To ensure the best print quality from the HP Photosmart, you will need to perform some simple maintenance procedures and, when prompted by a message on the display, replace the ink cartridges. Information on ink cartridges and the printhead The following tips help maintain HP ink cartridges and ensure consistent print quality. • Make sure you follow the instructions in the Start Here guide for installing the printhead and the ink cartridges for the first time. For information on the ink cartridges used by this product, see the back cover of this guide. • If you need to replace an ink cartridge, wait until you have the new ink cartridge available to install before removing the old cartridge. CAUTION: Wait until you have a new ink cartridge available before removing the old ink cartridge. Do not leave the ink cartridge outside of the product for an extended period of time. This can result in damage to both the product and the ink cartridge. • Keep all ink cartridges in the original sealed packages until they are needed. • Turn off the HP Photosmart by pressing the On button located on the product. Wait until the On light turns off before unplugging the power cord or turning off a power strip. If you improperly turn off the HP Photosmart, the print carriage might not return to the correct position causing problems with the ink cartridges and print quality issues. • Store ink cartridges at room temperature (15.6-26.6° C or 60-78° F). • You do not need to replace the cartridges until print quality becomes unacceptable, but a significant decrease in print quality may be the result of one or more depleted cartridges. It could also be caused by a clogged printhead. Possible solutions include checking the estimated ink levels remaining in the cartridges, and cleaning the printhead. Cleaning the printhead will use some ink. NOTE: Ink level warnings and indicators provide estimates for planning purposes only. When you receive a low-ink warning message, consider having a replacement cartridge available to avoid possible printing delays. You do not need to replace the ink cartridges until print quality becomes unacceptable. • Do not clean the printhead unnecessarily. This wastes ink and shortens the life of the cartridges. • Handle ink cartridges carefully. Dropping, jarring, or rough handling during installation can cause temporary printing problems. • If you are transporting the product, do the following to prevent ink leaking from the print carriage or other damage from occurring to the product: ◦ Make sure you turn off the product by pressing the On button. The print carriage should be parked on the right side in the service station. ◦ Make sure you leave the ink cartridges and printhead installed. ◦ Lightly pack the inside of the product with crumpled newspaper to prevent the print carriage from moving during transportation. ◦ The product must be transported sitting flat; it should not be placed its side, back, front, or top. Check the estimated ink levels You can easily check the ink supply level to determine how soon you might need to replace an ink cartridge. The ink supply level shows an estimate of the amount of ink remaining in the ink cartridges. NOTE: 1 If you have installed a refilled or remanufactured cartridge, or a cartridge that has been used in another printer, the ink level indicator might be inaccurate or unavailable. Work with ink cartridges and the printhead 13
-
 1
1 -
2
-
3
-
4
-
5
-
6
-
7
-
8
-
9
-
10
-
 11
11 -
 12
12 -
 13
13 -
 14
14 -
 15
15 -
 16
16 -
 17
17 -
 18
18 -
 19
19 -
 20
20 -
 21
21 -
22
-
23
-
24
-
25
-
26
-
27
-
28
-
29
-
30
-
31
-
32
-
33
-
34
-
35
-
36
-
37
-
38
-
39
-
40
-
41
-
42
-
43
-
44
-
45
-
46
-
47
-
48
-
49
-
50
-
51
-
52
-
53
-
54
-
55
-
56
-
57
-
58
-
59
-
60
-
61
-
62
-
63
-
64
-
65
-
66
-
67
-
68
-
69
-
70
-
71
-
72
-
73
-
74
 |
 |