HP B9180 User Guide - Page 7
Printer parts, Windows, HP Digital Imaging Monitor, Launch/Show HP Solution Center, printer software - ink cartridges
 |
UPC - 882780360518
View all HP B9180 manuals
Add to My Manuals
Save this manual to your list of manuals |
Page 7 highlights
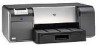
Chapter 1 - Order supplies - Start HP Photosmart Premier software After you have installed the HP Photosmart printer software on a computer, open and explore the HP Solution Center. Windows: Right-click the HP Digital Imaging Monitor icon on the Windows taskbar, and then click Launch/Show HP Solution Center. Note In this user guide, printer software refers to the HP Photosmart software that comes on the CD with the printer. The printer driver is the part of the printer software which controls the printer. Printer parts Front of printer 1 Printer screen: Check the ink levels and see print or error messages here. 2 Control panel: Use these buttons to open and navigate the printer menu, cancel print jobs, and respond to prompts on the printer screen. 3 Top door: Lift to gain access to the printheads and to clear paper jams. 4 Specialty media tray (closed): Lower to insert a single sheet of rigid or thick media, such as card stock. Place the media with the side to be printed facing up in this tray. Do not load media thicker than 1.5 mm, or more than one sheet at a time. 5 Ink cartridge door: Press the raised bumps at the top of the door to open the door and insert or remove ink cartridges. 6 On button: Press to turn on the printer. Flashes blue if the printer is busy. 7 Output tray: Print jobs come out here. For easier access to the main tray, you can remove the output tray by sliding it towards you. 8 Main tray: Place a stack of plain paper or photo paper in this tray for printing. Place the media into this tray with the side to be printed facing down. 4 HP Photosmart Pro B9100 series printer
-
 1
1 -
 2
2 -
 3
3 -
 4
4 -
 5
5 -
 6
6 -
 7
7 -
 8
8 -
 9
9 -
 10
10 -
 11
11 -
 12
12 -
13
-
14
-
15
-
16
-
17
-
18
-
19
-
20
-
21
-
22
-
23
-
24
-
25
-
26
-
27
-
28
-
29
-
30
-
31
-
32
-
33
-
34
-
35
-
36
-
37
-
38
-
39
-
40
-
41
-
42
-
43
-
44
-
45
-
46
-
47
-
48
-
49
-
50
-
51
-
52
-
53
-
54
-
55
-
56
-
57
-
58
-
59
-
60
-
61
-
62
-
63
-
64
-
65
-
66
-
67
-
68
-
69
-
70
-
71
-
72
-
73
-
74
-
75
 |
 |
