HP Color LaserJet 2550 HP Color LaserJet 2550 series - User Guide - Page 47
Selecting a Source, Selecting a Type or Size, Setting a custom paper size, Paper Source, Print
 |
View all HP Color LaserJet 2550 manuals
Add to My Manuals
Save this manual to your list of manuals |
Page 47 highlights
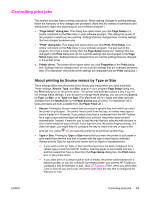
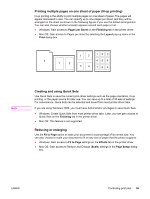
ENWW ● Printing multiple pages on one sheet of paper (N-up printing) ● Creating and using Quick Sets ● Reducing or enlarging ● Printing on different paper for the first page ● Changing the print quality ● Restoring the default printer-driver settings For manual duplexing, see Printing on both sides (duplexing manually). Selecting a Source You can print by Source (tray) or by Type or Size. To print by Source, follow these steps. For more information, see Controlling print jobs. For Macintosh operating systems, types and sizes are grouped together under the Paper Source pop-up menu. ● Windows: In the Print dialog box in your software program, select the Source (tray), if possible. Otherwise, select a tray from the Source is field from the Paper tab in your printer driver. ● Mac OS 9.x: In the Print dialog box, select a tray on the Paper Source pop-up menu on the General pop-up menu. ● Mac OS X: From the Print dialog box, select the tray or type of media on the Paper Feed pop-up menu. Selecting a Type or Size You can print by Source (tray) or by Type or Size. If you are printing on special print media, such as heavy paper, it is important to print by Type to achieve good results. To print by Type or Size, follow these steps. For more information, see Controlling print jobs. For Macintosh operating systems, types and sizes are all grouped together under the Paper Source pop-up menu. ● Windows: In the printer driver, select a type in the Type is field of the Paper tab. Or, select a size from the Size is field. For some paper, such as letterhead, you select both a type and size. ● Mac OS 9.x: In the Print dialog box, select a type on the Paper Source pop-up menu on the General pop-up menu. ● Mac OS X: In the Print dialog box, select the tray or type of media on the Paper Feed pop-up menu. Setting a custom paper size Use the Custom Paper feature to set up the printer to print to sizes other than standard ones. ● Windows: Try to set this setting from one of these locations, in this order: the Page Setup dialog box in the program, the Print dialog box in the program, or the Paper tab in the printer driver. ● Mac OS 9.x: Gain access to Custom Paper features in the Page Setup dialog box. On the Page Attributes pop-up menu, select Custom Page Size. ● Mac OS X: To set a custom paper size, click File, and then click Page Setup. Click the Page Attributes menu, and select Custom Paper Size. (Mac OS X v. 10.1 does not support custom paper-size settings.) Controlling print jobs 37
-
 1
1 -
2
-
3
-
4
-
5
-
6
-
7
-
8
-
9
-
10
-
11
-
12
-
13
-
14
-
15
-
16
-
17
-
18
-
19
-
20
-
21
-
22
-
23
-
24
-
25
-
26
-
27
-
28
-
29
-
30
-
31
-
32
-
33
-
34
-
35
-
36
-
37
-
38
-
39
-
40
-
41
-
 42
42 -
 43
43 -
 44
44 -
 45
45 -
 46
46 -
 47
47 -
 48
48 -
 49
49 -
 50
50 -
 51
51 -
 52
52 -
53
-
54
-
55
-
56
-
57
-
58
-
59
-
60
-
61
-
62
-
63
-
64
-
65
-
66
-
67
-
68
-
69
-
70
-
71
-
72
-
73
-
74
-
75
-
76
-
77
-
78
-
79
-
80
-
81
-
82
-
83
-
84
-
85
-
86
-
87
-
88
-
89
-
90
-
91
-
92
-
93
-
94
-
95
-
96
-
97
-
98
-
99
-
100
-
101
-
102
-
103
-
104
-
105
-
106
-
107
-
108
-
109
-
110
-
111
-
112
-
113
-
114
-
115
-
116
-
117
-
118
-
119
-
120
-
121
-
122
-
123
-
124
-
125
-
126
-
127
-
128
-
129
-
130
-
131
-
132
-
133
-
134
-
135
-
136
-
137
-
138
-
139
-
140
-
141
-
142
-
143
-
144
-
145
-
146
-
147
-
148
-
149
-
150
-
151
-
152
-
153
-
154
-
155
-
156
-
157
-
158
-
159
-
160
-
161
-
162
-
163
-
164
-
165
-
166
-
167
-
168
-
169
-
170
-
171
-
172
-
173
-
174
-
175
-
176
 |
 |