HP Contura 400 Compaq Contura 400 Family of Personal Computers Maintenance and - Page 98
The System Board All Models, screw locks
 |
View all HP Contura 400 manuals
Add to My Manuals
Save this manual to your list of manuals |
Page 98 highlights
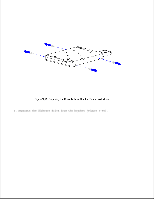
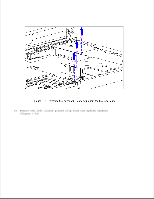
4. Reconnect the Diskette Drive Cable and reinstall the three screws. Chapter 3.15 The System Board (All Models) To remove the system board, follow these steps: 1. Disconnect all power from the computer and remove the AC Adapter and battery pack (Section 3.2). 2. Remove the hard drive (Section 3.5). 3. Remove the memory expansion board, if installed (Section 3.6). 4. On the rear of the computer, use a hex socket driver to remove the six screw locks (Figure 3-48). 5. Using a Torx-T8 driver, remove the two alignment screws from the docking base connector (Figure 3-48).
-
 1
1 -
2
-
3
-
4
-
5
-
6
-
7
-
8
-
9
-
10
-
11
-
12
-
13
-
14
-
15
-
16
-
17
-
18
-
19
-
20
-
21
-
22
-
23
-
24
-
25
-
26
-
27
-
28
-
29
-
30
-
31
-
32
-
33
-
34
-
35
-
36
-
37
-
38
-
39
-
40
-
41
-
42
-
43
-
44
-
45
-
46
-
47
-
48
-
49
-
50
-
51
-
52
-
53
-
54
-
55
-
56
-
57
-
58
-
59
-
60
-
61
-
62
-
63
-
64
-
65
-
66
-
67
-
68
-
69
-
70
-
71
-
72
-
73
-
74
-
75
-
76
-
77
-
78
-
79
-
80
-
81
-
82
-
83
-
84
-
85
-
86
-
87
-
88
-
89
-
90
-
91
-
92
-
 93
93 -
 94
94 -
 95
95 -
 96
96 -
 97
97 -
 98
98 -
 99
99 -
 100
100 -
 101
101 -
 102
102 -
 103
103 -
104
-
105
-
106
-
107
-
108
-
109
-
110
-
111
-
112
-
113
-
114
-
115
-
116
-
117
-
118
-
119
-
120
-
121
-
122
-
123
-
124
-
125
-
126
-
127
-
128
-
129
-
130
-
131
-
132
-
133
-
134
-
135
-
136
-
137
-
138
-
139
-
140
-
141
-
142
-
143
-
144
-
145
-
146
-
147
-
148
-
149
-
150
-
151
-
152
-
153
-
154
-
155
-
156
-
157
-
158
-
159
-
160
-
161
-
162
-
163
-
164
-
165
-
166
-
167
-
168
-
169
-
170
-
171
-
172
-
173
-
174
-
175
-
176
-
177
-
178
-
179
-
180
-
181
-
182
-
183
-
184
-
185
-
186
-
187
-
188
-
189
-
190
-
191
-
192
-
193
-
194
-
195
-
196
-
197
-
198
-
199
-
200
-
201
-
202
-
203
-
204
-
205
-
206
-
207
-
208
-
209
-
210
-
211
-
212
-
213
-
214
-
215
-
216
-
217
-
218
-
219
-
220
-
221
-
222
-
223
-
224
-
225
-
226
-
227
-
228
-
229
-
230
-
231
-
232
-
233
-
234
-
235
-
236
-
237
-
238
-
239
-
240
-
241
-
242
-
243
-
244
-
245
-
246
-
247
-
248
-
249
-
250
-
251
-
252
-
253
-
254
-
255
-
256
-
257
-
258
-
259
-
260
-
261
-
262
-
263
-
264
-
265
-
266
-
267
-
268
-
269
-
270
-
271
-
272
-
273
-
274
-
275
-
276
-
277
-
278
-
279
-
280
-
281
-
282
-
283
-
284
-
285
-
286
-
287
-
288
-
289
-
290
-
291
-
292
-
293
-
294
-
295
-
296
-
297
-
298
-
299
-
300
 |
 |

4. Reconnect the Diskette Drive Cable and reinstall the three screws.
Chapter 3.15 The System Board (All Models)
To remove the system board, follow these steps:
1. Disconnect all power from the computer and remove the AC Adapter and
battery pack (Section 3.2).
2. Remove the hard drive (Section 3.5).
3. Remove the memory expansion board, if installed (Section 3.6).
4. On the rear of the computer, use a hex socket driver to remove the six
screw locks (Figure 3-48).
5. Using a Torx-T8 driver, remove the two alignment screws from the
docking base connector (Figure 3-48).