HP D2D HP StorageWorks HP D2D Backup System rack models service and maintenanc - Page 32
P812 controller failure (HP D2D4324), HP SAS expander card (HP D2D4324 and D2D4312
 |
View all HP D2D manuals
Add to My Manuals
Save this manual to your list of manuals |
Page 32 highlights
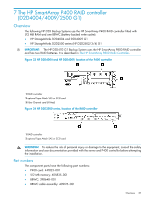
4. Replace the cover, as described in the appropriate HP ProLiant Maintenance and Service guide, and power on the HP D2D Backup System. 5. Install the SAAP license. a. Reboot the system. b. During the POST screen, when advised, hit any key to see further messages. c. Enter the Smart Array POST ORCA utility by pressing [F8] when details for the P411 card are displayed during the POST messages. d. Select the Manage Licenses option in the Smart Array menu, and then select Install Licenses. e. Enter the licence key previously noted. P812 controller failure (HP D2D4324) IMPORTANT: When replacing the P812 controller be sure to always replace cards into the same slot from which they were removed. See also the rear view drawings in Chapter 1. The FBWC is an integral part of the card. 1. Power off the HP D2D Backup System. Remove the cover from the HP D2D, as described in the appropriate HP ProLiant Maintenance and Service guide, and locate the P812 controllers in PCI-e slots 4, 5 and 6. NOTE: The LEDs on the P812 controller card provide diagnostic information when the unit is powered on. For a detailed description of these LEDs, refer to the "HP Smart Arrays for HP ProLiant Servers user guide". 2. Unclip the blue PCIe card retaining latch and remove the PCIe card. 3. Install the new P812 card and check that it is seated properly. Close the blue PCIe card retaining latch. 4. Replace the cover, as described in the appropriate HP ProLiant Maintenance and Service guide, and power on the HP D2D Backup System. HP SAS expander card (HP D2D4324 and D2D4312) If no disks are showing on the Storage-Shelves page of the D2D Web Management Interface, there may be a problem with the HP SAS expander card. The part number for a replacement card is: 468405-001. It must be installed in PCI-e slot 1. Mini-SAS cables (part numbers 493228-005 and 493228-006) connect the expander card to the hard disk drive backplane, as described in the following table. SAS cables are also connected from the motherboard to the SAS expander card NOTE: Tuck the mini-SAS cables to be routed to the backplane into the side of the chassis. Loop the SAS cables to connect to the motherboard in the void. Table 7 Cabling to HP SAS expander card (HP D2D4312) Connect 1 493228-006 mini-SAS cable 2 493228-006 mini-SAS cable 3 493228-005 mini-SAS cable 4 493228-005 mini-SAS cable From. Port 2C on SAS expander card Port 3C on SAS expander card Port 4C on SAS expander card Port 5C on SAS expander card To Bottom right HDD backplane connector Top right HDD backplane connector Bottom left HDD backplane connector Top left HDD backplane connector 32 The HP SmartArray P410i and P812/P411 RAID controllers and HP SAS expander card (HP D2D4324 and 4312)
-
 1
1 -
2
-
3
-
4
-
5
-
6
-
7
-
8
-
9
-
10
-
11
-
12
-
13
-
14
-
15
-
16
-
17
-
18
-
19
-
20
-
21
-
22
-
23
-
24
-
25
-
26
-
 27
27 -
 28
28 -
 29
29 -
 30
30 -
 31
31 -
 32
32 -
 33
33 -
 34
34 -
 35
35 -
 36
36 -
 37
37 -
38
-
39
-
40
-
41
-
42
-
43
-
44
 |
 |
