HP D5360 User Guide - Page 7
Control panel features, Color graphics display, Attention light, Print Photos, Photo Tray - photosmart
 |
UPC - 883585233922
View all HP D5360 manuals
Add to My Manuals
Save this manual to your list of manuals |
Page 7 highlights
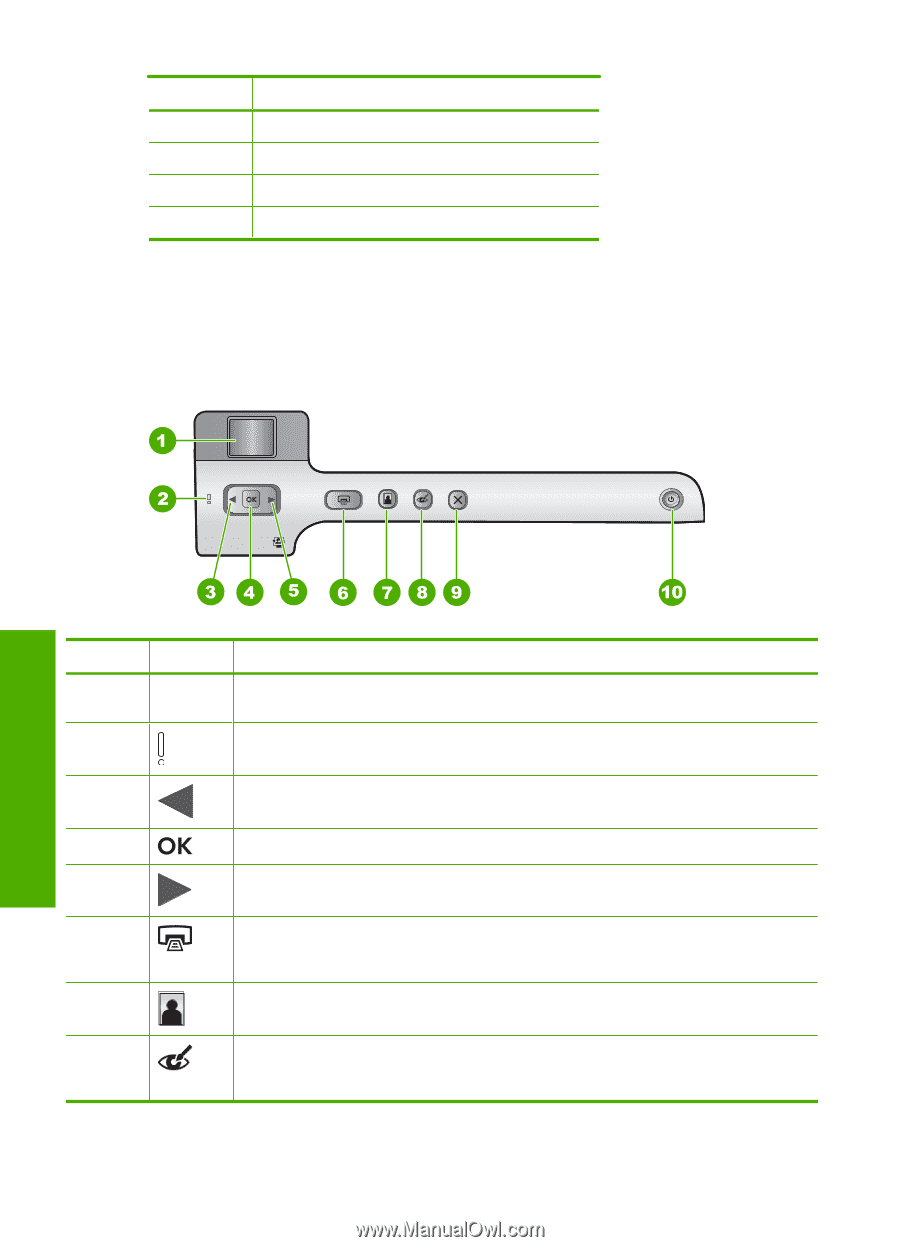
Chapter 2 (continued) Label Description 11 Print cartridge door 12 Two-sided printing accessory 13 Rear USB port 14 Power connection* * Use only with the power adapter supplied by HP. Control panel features The following diagram and related table provide a quick reference to the HP Photosmart control panel features. Overview Label 1 2 3 4 5 6 Icon 7 8 Name and Description Color graphics display (also referred to as the display): Shows photos on a memory card. Also shows status and error messages. Attention light: Indicates a problem occurred. See the display for more information. Left arrow: The left button returns to the previous display screen or photo on the memory card. OK: Selects a photo for printing or selects a menu option. Right arrow: The right button will navigate to the next display screen or photo on the memory card. Print Photos: Prints the photos selected on your memory card. If no photos are currently selected, the HP Photosmart prints the photo currently showing on the display. Photo Tray: Selects the Photo Tray for the next photo you print from a memory card. Red-Eye Removal: Turns the Red-Eye Removal feature On or Off. By default, this feature is turned off. When the feature is turned on, the HP Photosmart automatically corrects red eye coloring in the photo currently shown on the display. 6 HP Photosmart overview
-
 1
1 -
 2
2 -
 3
3 -
 4
4 -
 5
5 -
 6
6 -
 7
7 -
 8
8 -
 9
9 -
 10
10 -
 11
11 -
 12
12 -
13
-
14
-
15
-
16
-
17
-
18
-
19
-
20
-
21
-
22
-
23
-
24
-
25
-
26
-
27
-
28
-
29
-
30
-
31
-
32
-
33
-
34
-
35
-
36
-
37
-
38
-
39
-
40
-
41
-
42
-
43
-
44
-
45
-
46
-
47
-
48
-
49
-
50
-
51
-
52
-
53
-
54
-
55
-
56
-
57
-
58
-
59
-
60
-
61
-
62
-
63
-
64
-
65
-
66
-
67
-
68
-
69
-
70
-
71
-
72
-
73
-
74
-
75
-
76
-
77
-
78
-
79
-
80
-
81
-
82
-
83
-
84
-
85
-
86
-
87
-
88
-
89
-
90
-
91
-
92
-
93
-
94
-
95
-
96
-
97
-
98
-
99
-
100
-
101
-
102
-
103
-
104
-
105
-
106
-
107
-
108
-
109
-
110
-
111
-
112
-
113
-
114
-
115
-
116
-
117
-
118
-
119
-
120
-
121
-
122
-
123
-
124
-
125
-
126
-
127
-
128
-
129
-
130
-
131
-
132
-
133
-
134
-
135
-
136
-
137
-
138
-
139
-
140
-
141
-
142
-
143
-
144
-
145
-
146
-
147
-
148
-
149
 |
 |