HP DesignJet T1530 Security Features - Page 27
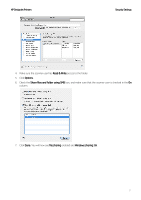
to save the configuration.
 |
View all HP DesignJet T1530 manuals
Add to My Manuals
Save this manual to your list of manuals |
Page 27 highlights
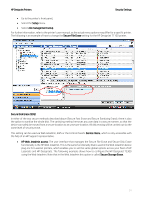
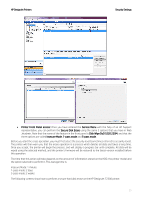
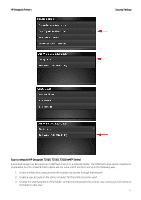
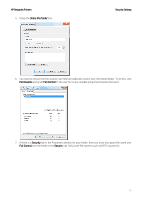
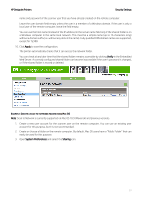
HP DesignJet Printers Security Settings 4. Create a share name for the folder. Note: It is important to complete the above steps before starting the remaining steps below. 5. In the printer's Embedded Web Server, select the Setup tab and then Scan to network. 6. On the Scan to network page, click Add folder details, and fill in the various fields. • The Server name should contain the network name of the remote computer. This remote computer must be connected in the local network to the printer. • The Folder name should contain the share name of the folder. • The User name should contain the name of the scanner user. • The User password should contain the password of the scanner user. • The Domain name should contain the name of the domain in which the user name exists. If the scanner user does not belong to any domain, leave this field empty. The server and folder names are used to connect to the shared folder by building a network folder path as follows: \\SERVER NAME\FOLDER NAME 7. Click Apply to save the configuration. The printer automatically checks that it can access the network folder. EXAMPLE: CREATE A SCAN-TO-NETWORK FOLDER USING WINDOWS 1. Create a new user account for the scanner user on the remote computer. You can use an existing user account for this purpose, but it is not recommended. 2. Create a new folder on the remote computer (unless you want to use an existing folder). 3. Right-click the folder and select Properties. 4. In the Sharing tab, click the Advanced Sharing button. 27
-
 1
1 -
2
-
3
-
4
-
5
-
6
-
7
-
8
-
9
-
10
-
11
-
12
-
13
-
14
-
15
-
16
-
17
-
18
-
19
-
20
-
21
-
 22
22 -
 23
23 -
 24
24 -
 25
25 -
 26
26 -
 27
27 -
 28
28 -
 29
29 -
 30
30 -
 31
31 -
 32
32 -
33
-
34
-
35
-
36
-
37
-
38
-
39
-
40
-
41
-
42
-
43
-
44
-
45
-
46
-
47
-
48
-
49
-
50
-
51
-
52
-
53
-
54
-
55
-
56
-
57
-
58
-
59
-
60
-
61
-
62
-
63
-
64
-
65
-
66
-
67
-
68
-
69
-
70
-
71
-
72
-
73
-
74
-
75
-
76
-
77
-
78
-
79
-
80
 |
 |