HP Designjet Z5200 HP Designjet Z5200ps Photo Printer - Using your printer - Page 25
Connect directly to a computer (Mac OS), IP Printing, printer is not in the list, Continue
 |
View all HP Designjet Z5200 manuals
Add to My Manuals
Save this manual to your list of manuals |
Page 25 highlights
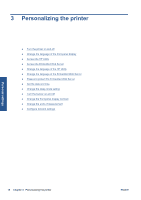
Software installation 8. When you reach the Select Printer screen, look for your printer's URL (which you noted in step 1) in the Printer Name column. ● If you find the right printer name, scroll sideways to see the Connection Type column, and check that it shows IP Printing. Then highlight that line. Otherwise, continue searching further down the list. ● If you cannot find your printer name with an IP Printing connection type, check the box My printer is not in the list. Click Continue. 9. Continue following the instructions on the screen. When you reach the Printer Queue Created screen, click Quit to exit, or Create New Queue if you want to connect another printer to the network. 10. When the HP Printer Setup Assistant has finished, you can remove the CD from the CD drive. If the printer driver is already installed, the HP Printer Setup Assistant can be run at any time from the CD. Connect directly to a computer (Mac OS) You can connect your printer directly to a computer without going through a network, by using the printer's built-in USB 2.0 socket. 1. Make sure the printer is either turned off or disconnected from the computer. 2. Insert the HP Start-up Kit CD into your CD drive. 3. Open the CD icon on your desktop. 4. Open the Mac OS X HP Designjet Installer icon. 5. Follow the instructions on your screen. You are recommended to use the Easy Install option, which will install the PCL3 (raster) printer driver. If you would like to install the PostScript driver, select Custom Installation. 6. The printer software is installed, including the printer driver and the HP Utility. 7. When the software has been installed, the HP Printer Setup Assistant starts automatically, to set up a connection to your printer. 8. Make sure that the printer is turned on and connected to the computer with a certified USB cable. NOTE: The use of non-certified USB cables can lead to connectivity problems. Only cables certified by the USB Implementor's Forum (http://www.usb.org/) should be used with this printer. ENWW Connect directly to a computer (Mac OS) 15
-
 1
1 -
2
-
3
-
4
-
5
-
6
-
7
-
8
-
9
-
10
-
11
-
12
-
13
-
14
-
15
-
16
-
17
-
18
-
19
-
 20
20 -
 21
21 -
 22
22 -
 23
23 -
 24
24 -
 25
25 -
 26
26 -
 27
27 -
 28
28 -
 29
29 -
 30
30 -
31
-
32
-
33
-
34
-
35
-
36
-
37
-
38
-
39
-
40
-
41
-
42
-
43
-
44
-
45
-
46
-
47
-
48
-
49
-
50
-
51
-
52
-
53
-
54
-
55
-
56
-
57
-
58
-
59
-
60
-
61
-
62
-
63
-
64
-
65
-
66
-
67
-
68
-
69
-
70
-
71
-
72
-
73
-
74
-
75
-
76
-
77
-
78
-
79
-
80
-
81
-
82
-
83
-
84
-
85
-
86
-
87
-
88
-
89
-
90
-
91
-
92
-
93
-
94
-
95
-
96
-
97
-
98
-
99
-
100
-
101
-
102
-
103
-
104
-
105
-
106
-
107
-
108
-
109
-
110
-
111
-
112
-
113
-
114
-
115
-
116
-
117
-
118
-
119
-
120
-
121
-
122
-
123
-
124
-
125
-
126
-
127
-
128
-
129
-
130
-
131
-
132
-
133
-
134
-
135
-
136
-
137
-
138
-
139
-
140
-
141
-
142
-
143
-
144
-
145
-
146
-
147
-
148
-
149
-
150
-
151
-
152
-
153
-
154
-
155
-
156
-
157
-
158
-
159
-
160
-
161
-
162
-
163
-
164
-
165
-
166
-
167
-
168
-
169
-
170
-
171
-
172
-
173
-
174
-
175
-
176
-
177
-
178
-
179
-
180
-
181
-
182
-
183
-
184
-
185
-
186
-
187
-
188
-
189
-
190
-
191
-
192
-
193
-
194
-
195
-
196
-
197
 |
 |