HP Deskjet 6980 Setup Guide - Page 7
Wireless: Connect Now
 |
UPC - 882780129580
View all HP Deskjet 6980 manuals
Add to My Manuals
Save this manual to your list of manuals |
Page 7 highlights
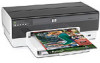
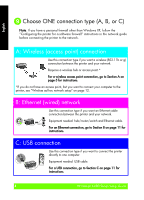
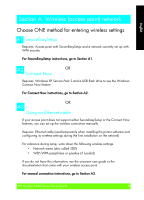
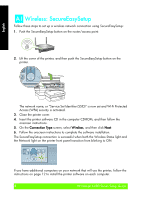
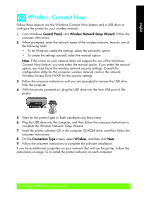
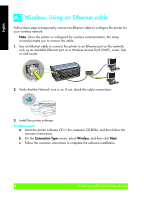
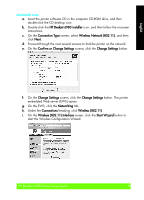
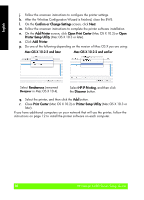
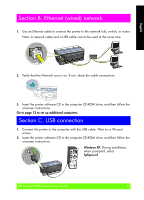
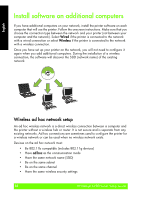
English A2 Wireless: Connect Now Follow these steps to use the Windows Connect Now feature and a USB drive to configure the printer for your wireless network: A2 1. From Windows Control Panel, click Wireless Network Setup Wizard. Follow the onscreen instructions. 2. When prompted, enter the network name of the wireless network, then do one of the following tasks: • To let Windows create the settings, select the automatic option. • To create the settings yourself, select the manual option. Note: If the router on your network does not support the use of the Windows Connect Now feature, you must select the manual option. If you select the manual option, you must know the wireless network security settings. Consult the configuration utility for the computer wireless network card or the network Wireless Access Point (WAP) for the security settings. 3. Follow the onscreen instructions until you are prompted to remove the USB drive from the computer. 4. With the printer powered on, plug the USB drive into the front USB port of the printer. 5. Wait for the printer lights to flash simultaneously three times. 6. Plug the USB drive into the computer, and then follow the onscreen instructions to complete the Wireless Network Setup Wizard. 7. Insert the printer software CD in the computer CD-ROM drive, and then follow the onscreen instructions. 8. On the Connection Type screen, select Wireless, and then click Next. 9. Follow the onscreen instructions to complete the software installation. If you have additional computers on your network that will use the printer, follow the instructions on page 12 to install the printer software on each computer. HP Deskjet 6980 Series Setup Guide 7
-
 1
1 -
 2
2 -
 3
3 -
 4
4 -
 5
5 -
 6
6 -
 7
7 -
 8
8 -
 9
9 -
 10
10 -
 11
11 -
 12
12 -
13
-
14
-
15
-
16
-
17
 |
 |