HP Deskjet 840/842/843c (English) Macintosh Connect * User's Guide - C6419-900 - Page 56
Setup Instructions
 |
View all HP Deskjet 840/842/843c manuals
Add to My Manuals
Save this manual to your list of manuals |
Page 56 highlights
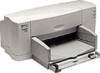
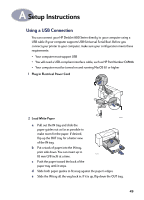
A Setup Instructions Using a USB Connection You can connect your HP DeskJet 800 Series directly to your computer using a USB cable if your computer supports USB (Universal Serial Bus). Before you connect your printer to your computer, make sure your configuration meets these requirements: • Your computer must support USB • You will need a USB-compliant interface cable, such as HP Part Number C6518A • Your computer must be turned on and running MacOS 8.1 or higher 1 Plug in Electrical Power Cord 2 Load White Paper 6410023 a Pull out the IN tray and slide the paper guides out as far as possible to make room for the paper. If desired, flip up the OUT tray for a better view of the IN tray. b Put a stack of paper into the IN tray, print side down. You can insert up to 6410008 10 mm (3/8 inch) at a time. c Push the paper toward the back of the paper tray until it stops. d Slide both paper guides to fit snug against the paper's edges. e Slide the IN tray all the way back in. If it is up, flip down the OUT tray. 49
-
 1
1 -
2
-
3
-
4
-
5
-
6
-
7
-
8
-
9
-
10
-
11
-
12
-
13
-
14
-
15
-
16
-
17
-
18
-
19
-
20
-
21
-
22
-
23
-
24
-
25
-
26
-
27
-
28
-
29
-
30
-
31
-
32
-
33
-
34
-
35
-
36
-
37
-
38
-
39
-
40
-
41
-
42
-
43
-
44
-
45
-
46
-
47
-
48
-
49
-
50
-
 51
51 -
 52
52 -
 53
53 -
 54
54 -
 55
55 -
 56
56 -
 57
57 -
 58
58 -
 59
59 -
 60
60 -
 61
61 -
62
-
63
-
64
-
65
-
66
-
67
 |
 |
