HP ENVY 17-3095ca HP ENVY 17 - Maintenance and Service Guide - Page 68
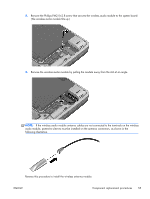
Remove the three Phillips PM2.5×3.6 screws, the top cover with double-sided adhesive.
 |
View all HP ENVY 17-3095ca manuals
Add to My Manuals
Save this manual to your list of manuals |
Page 68 highlights
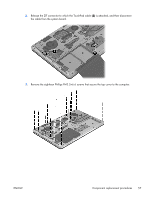
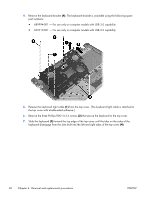
4. Remove the keyboard bracket (4). The keyboard bracket is available using the following spare part numbers: ● 689994-001 - For use only on computer models with USB 3.0 capability ● 665910-001 - For use only on computer models with USB 2.0 capability 5. Release the keyboard light cable (1) from the top cover. (The keyboard light cable is attached to the top cover with double-sided adhesive.) 6. Remove the three Phillips PM2.5×3.6 screws (2) that secure the keyboard to the top cover. 7. Slide the keyboard (3) toward the top edge of the top cover until the tabs on the sides of the keyboard disengage from the slots built into the left and right sides of the top cover (4). 60 Chapter 4 Removal and replacement procedures ENWW
-
 1
1 -
2
-
3
-
4
-
5
-
6
-
7
-
8
-
9
-
10
-
11
-
12
-
13
-
14
-
15
-
16
-
17
-
18
-
19
-
20
-
21
-
22
-
23
-
24
-
25
-
26
-
27
-
28
-
29
-
30
-
31
-
32
-
33
-
34
-
35
-
36
-
37
-
38
-
39
-
40
-
41
-
42
-
43
-
44
-
45
-
46
-
47
-
48
-
49
-
50
-
51
-
52
-
53
-
54
-
55
-
56
-
57
-
58
-
59
-
60
-
61
-
62
-
 63
63 -
 64
64 -
 65
65 -
 66
66 -
 67
67 -
 68
68 -
 69
69 -
 70
70 -
 71
71 -
 72
72 -
 73
73 -
74
-
75
-
76
-
77
-
78
-
79
-
80
-
81
-
82
-
83
-
84
-
85
-
86
-
87
-
88
-
89
-
90
-
91
-
92
-
93
-
94
-
95
-
96
-
97
-
98
-
99
-
100
-
101
-
102
-
103
-
104
-
105
-
106
-
107
-
108
-
109
-
110
-
111
-
112
-
113
-
114
-
115
-
116
-
117
-
118
-
119
-
120
 |
 |
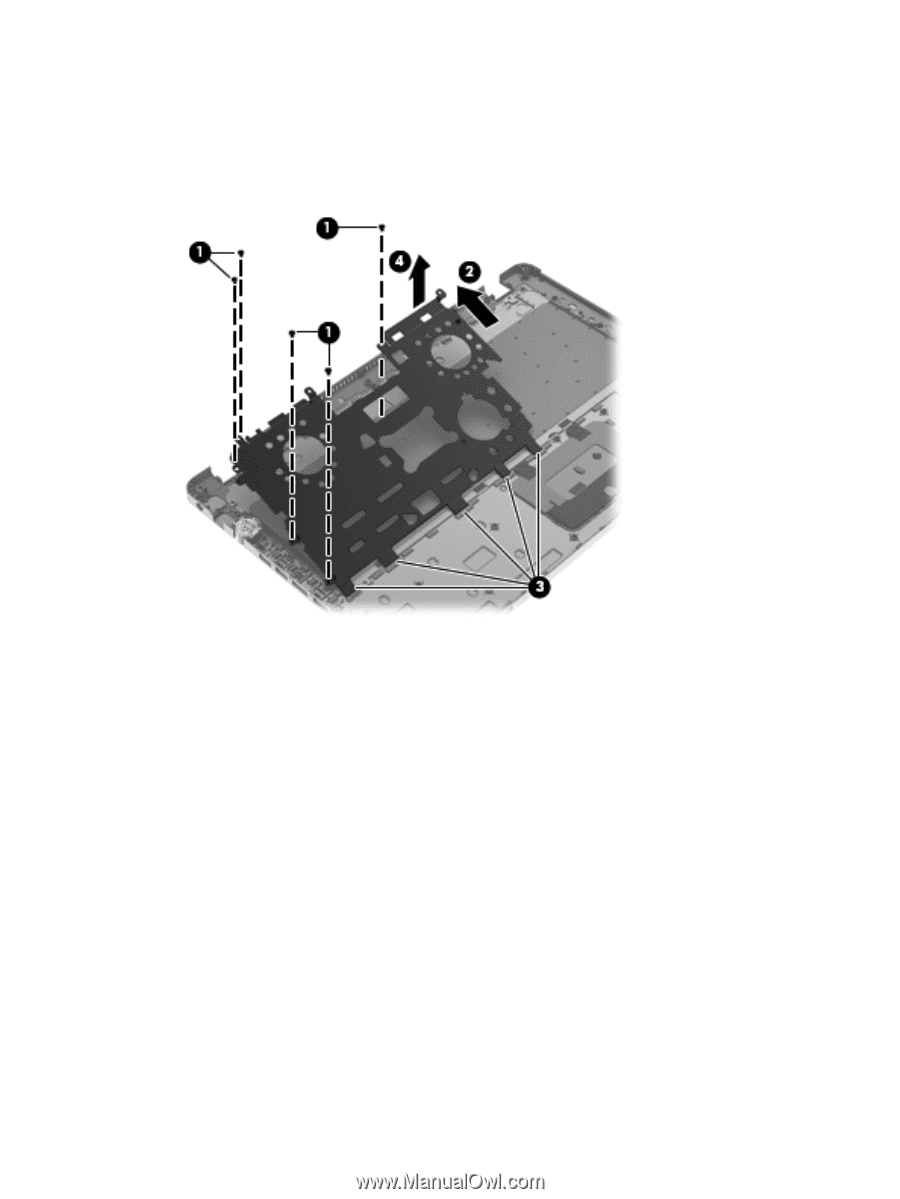
4.
Remove the keyboard bracket
(4)
. The keyboard bracket is available using the following spare
part numbers:
●
689994-001 — For use only on computer models with USB 3.0 capability
●
665910-001 — For use only on computer models with USB 2.0 capability
5.
Release the keyboard light cable
(1)
from the top cover. (The keyboard light cable is attached to
the top cover with double-sided adhesive.)
6.
Remove the three Phillips PM2.5×3.6 screws
(2)
that secure the keyboard to the top cover.
7.
Slide the keyboard
(3)
toward the top edge of the top cover until the tabs on the sides of the
keyboard disengage from the slots built into the left and right sides of the top cover
(4)
.
60
Chapter 4
Removal and replacement procedures
ENWW