HP ENVY 17-j011nr HP ENVY 17 Notebook PC HP ENVY TouchSmart m7 Notebook PC HP - Page 71
Disconnect the display panel cable from the display panel, and then remove the panel
 |
View all HP ENVY 17-j011nr manuals
Add to My Manuals
Save this manual to your list of manuals |
Page 71 highlights
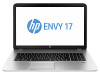
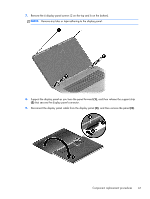
7. Remove the 6 display panel screws (2 on the top and 6 on the bottom). NOTE: Remove any tabs or tape adhering to the display panel. 8. Support the display panel as you lean the panel forward (1), and then release the support strip (2) that secures the display panel connector. 9. Disconnect the display panel cable from the display panel (3), and then remove the panel (4). Component replacement procedures 61
-
 1
1 -
2
-
3
-
4
-
5
-
6
-
7
-
8
-
9
-
10
-
11
-
12
-
13
-
14
-
15
-
16
-
17
-
18
-
19
-
20
-
21
-
22
-
23
-
24
-
25
-
26
-
27
-
28
-
29
-
30
-
31
-
32
-
33
-
34
-
35
-
36
-
37
-
38
-
39
-
40
-
41
-
42
-
43
-
44
-
45
-
46
-
47
-
48
-
49
-
50
-
51
-
52
-
53
-
54
-
55
-
56
-
57
-
58
-
59
-
60
-
61
-
62
-
63
-
64
-
65
-
 66
66 -
 67
67 -
 68
68 -
 69
69 -
 70
70 -
 71
71 -
 72
72 -
 73
73 -
 74
74 -
 75
75 -
 76
76 -
77
-
78
-
79
-
80
-
81
-
82
-
83
-
84
-
85
-
86
-
87
-
88
-
89
-
90
-
91
-
92
-
93
-
94
-
95
-
96
-
97
-
98
-
99
-
100
-
101
-
102
-
103
-
104
-
105
-
106
-
107
-
108
-
109
-
110
-
111
-
112
-
113
-
114
-
115
-
116
-
117
-
118
-
119
-
120
-
121
-
122
-
123
-
124
-
125
-
126
-
127
-
128
-
129
-
130
 |
 |

7.
Remove the 6 display panel screws (2 on the top and 6 on the bottom).
NOTE:
Remove any tabs or tape adhering to the display panel.
8.
Support the display panel as you lean the panel forward
(1)
, and then release the support strip
(2)
that secures the display panel connector.
9.
Disconnect the display panel cable from the display panel
(3)
, and then remove the panel
(4)
.
Component replacement procedures
61