HP ENVY m7-u100 Maintenance and Service Guide - Page 51
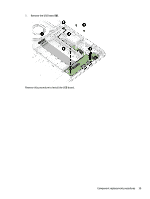
by sliding it up and to the right at an angle., Reverse this procedure to install the system board.
 |
View all HP ENVY m7-u100 manuals
Add to My Manuals
Save this manual to your list of manuals |
Page 51 highlights
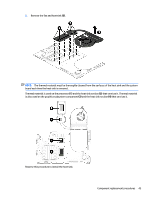
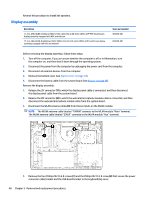
6. Remove the plastic support bridges (5). The plastic support bridges are included in the I/O Bracket Kit, spare part number 857824-001. 7. Release the system board (1) by lifting the right side and swinging it up and to the left until it rests at an angle. 8. Remove the system board (2) by sliding it up and to the right at an angle. Reverse this procedure to install the system board. Component replacement procedures 43
-
 1
1 -
2
-
3
-
4
-
5
-
6
-
7
-
8
-
9
-
10
-
11
-
12
-
13
-
14
-
15
-
16
-
17
-
18
-
19
-
20
-
21
-
22
-
23
-
24
-
25
-
26
-
27
-
28
-
29
-
30
-
31
-
32
-
33
-
34
-
35
-
36
-
37
-
38
-
39
-
40
-
41
-
42
-
43
-
44
-
45
-
 46
46 -
 47
47 -
 48
48 -
 49
49 -
 50
50 -
 51
51 -
 52
52 -
 53
53 -
 54
54 -
 55
55 -
 56
56 -
57
-
58
-
59
-
60
-
61
-
62
-
63
-
64
-
65
-
66
-
67
-
68
-
69
-
70
-
71
-
72
-
73
-
74
-
75
-
76
 |
 |

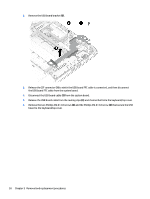
6.
Remove the plastic support bridges
(5)
.
The plastic support bridges are included in the I/O Bracket Kit, spare part number 857824-001.
7.
Release the system board
(1)
by lifting the right side and swinging it up and to the left until it rests at
an angle.
8.
Remove the system board
(2)
by sliding it up and to the right at an angle.
Reverse this procedure to install the system board.
Component replacement procedures
43