HP G3110 HP Scanjet G3110 User Guide - Page 11
Make copies, Number of Copies - solution center
 |
UPC - 883585789023
View all HP G3110 manuals
Add to My Manuals
Save this manual to your list of manuals |
Page 11 highlights
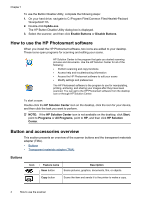
5. If you selected Show a preview and you want to scan another document, page, or picture, place the item on the glass and click Add Pages. When you are finished with all pages, click Finish. NOTE: If Show a preview was not selected, you might be prompted to scan additional documents, pages, or pictures. Click Yes to scan additional items, or click No to send the scanned image(s) to the specified location. 6. In the E-mail information of the Scan to E-mail Settings dialog box, enter a subject and the e-mail address of the recipient (or click Address Book... to select recipients). You can enter multiple e-mail addresses separated by commas. • To view the attachment before you send the e-mail, double-click the attachment. • To send yourself a copy of the e-mail, select Send me a copy of this e-mail. Make copies Use the Copy button ( ) to scan an original and send it to a printer. The Copy button is optimized to scan a duplicate of what is on the scanner glass. If you want to change the image, such as to lighten or darken it, or to adjust its size, click Cancel in the copy progress dialog box. Adjust the settings, and then complete the scan. If you use the HP Solution Center, you can also click the Make Copies button and adjust the settings in the preview screen. 1. Place the original face down on the scanner glass, as indicated by the reference marks. 2. Press the Copy button ( ). 3. In the Scan Settings area of the HP Copy dialog, select the type of original (Picture or Document, and select appropriate options (available options depend on the Original Type selected. • Click Show preview to preview the scan before sending it to the printer. • Click Autocrop picture(s) to print each picture individually when copying multiple pictures in a single scan. • Select or specify the Percent Scale (10% to 600%). 4. In the Print Settings area, click the Output Type (Color or Grayscale), specify the Number of Copies, and select a Printer. 5. Click Start. Make copies 9
-
 1
1 -
2
-
3
-
4
-
5
-
 6
6 -
 7
7 -
 8
8 -
 9
9 -
 10
10 -
 11
11 -
 12
12 -
 13
13 -
 14
14 -
 15
15 -
 16
16 -
17
-
18
-
19
-
20
-
21
-
22
-
23
-
24
-
25
-
26
-
27
-
28
-
29
-
30
 |
 |
