HP G3110 HP Scanjet G3110 User Guide - Page 9
Scan multiple pictures with one scan, Scan documents, Show a preview, HP Scanning, Add New Selection - software
 |
UPC - 883585789023
View all HP G3110 manuals
Add to My Manuals
Save this manual to your list of manuals |
Page 9 highlights
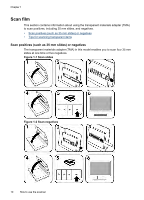
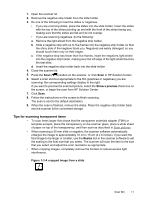
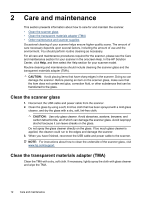
For scanning slides or negatives, see Scan film. 1. Place the original face down on the scanner glass, as indicated by the reference marks, and then close the lid. 2. Press the Scan button ( ). The Scanning from ... dialog box appears. 3. Select a scan shortcut; the corresponding settings display to the right. NOTE: If you want to preview scans before they are sent to their destination, select Show a preview in the HP Scanning shortcuts dialog box. 4. Click Scan. 5. If you selected Show a preview and you want to scan another document or picture, place the page on the glass and click Add New Selection. The software saves the scan to a subfolder in the My Scans folder. The subfolder is named for the current year and month. The scanned image is also sent to the HP Photosmart software by default. When you are finished with all pages, click Finish. NOTE: If Show a preview was not selected, you might be prompted to scan additional pictures. Click Yes to scan additional pictures, or click No to send the scanned image(s) to the specified location. Scan multiple pictures with one scan You can scan multiple pictures at the same time from the scanner glass. Arrange the pictures that you want to scan on the HP scanning device glass. For the best results, leave at least 0.25 inches (6 mm) of space between the edges of the pictures. Then follow the steps for scanning a picture. For more information, see Scan pictures. For more information, go to the Index tab in the onscreen Help. Type multiple in the keyword field and click multiple items, scan in the list. Scan documents Use the Scan button ( ) to scan documents. The scanner scans an original document to the destination that is selected in the HP Scanning dialog box. NOTE: If you want to preview scans before they are sent to their destination, select Show a preview in the HP Scanning shortcuts dialog box, or begin your scan from the HP Solution Center. 1. Place the original face down on the scanner glass, as indicated by the reference mark. 2. Press the Scan button ( ). The Scanning from ... dialog box appears. 3. Select the shortcut you want to use; the corresponding settings display to the right. Scan pictures and documents 7
-
 1
1 -
2
-
3
-
 4
4 -
 5
5 -
 6
6 -
 7
7 -
 8
8 -
 9
9 -
 10
10 -
 11
11 -
 12
12 -
 13
13 -
 14
14 -
15
-
16
-
17
-
18
-
19
-
20
-
21
-
22
-
23
-
24
-
25
-
26
-
27
-
28
-
29
-
30
 |
 |