HP G3110 HP Scanjet G3110 User Guide - Page 13
Tips for scanning transparent items, Show a preview, Resize, A cropped image from a slide - paper size
 |
UPC - 883585789023
View all HP G3110 manuals
Add to My Manuals
Save this manual to your list of manuals |
Page 13 highlights
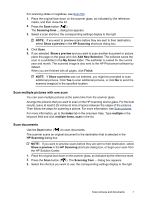
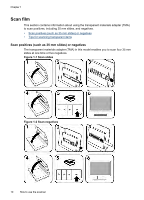
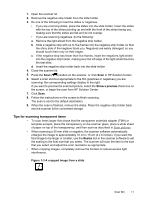
1. Open the scanner lid. 2. Remove the negative strip holder from the slide holder. 3. Do one of the following to load the slides or negatives: • If you are scanning slides, place the slides into the slide holder. Insert the slides with the top of the slides pointing up and with the front of the slides facing you, making sure that the slides are flat and do not overlap. • If you are scanning negatives, do the following: a. Remove the light-shield from the negative strip holder. b. Slide a negative strip with up to five frames into the negative strip holder so that the shiny side of the negative faces you. Negatives are easily damaged, so you should touch them only on their edges. c. If the negative strip has fewer than five frames, insert the negatives light-shield into the negative strip holder, making sure the left edge of the light-shield touches the last slide. d. Insert the negative strip holder back into the slide holder. 4. Close the scanner lid. 5. Press the Scan ( ) button on the scanner, or click Scan in HP Solution Center. 6. Select a scan shortcut appropriate to the film (positives or negatives) you are scanning; the corresponding settings display to the right. If you want to preview the scanned picture, select the Show a preview check box on the screen, or begin the scan from HP Solution Center. 7. Click Scan. 8. Follow the instructions on the screen to finish scanning. The scan is sent to the default destination. 9. When the scan is finished, remove the slides. Place the negative strip holder back into the scanner lid for convenient storage. Tips for scanning transparent items • To scan items larger than those that the transparent materials adapter (TMA) or template accepts, place the transparency on the scanner glass, place a white sheet of paper on top of the transparency, and then scan as described in Scan pictures. • When scanning a 35 mm slide or negative, the scanner software automatically enlarges the image to approximately 10 cm x 15 cm (4 x 6 inches). If you want the final image to be larger or smaller, use the Resize tool in the scanner software to set the scaling to the final size that you select. The scanner will scan the item to the size that you select and adjust the scan resolution as appropriate. • When cropping images, completely remove the borders to reduce excess light interference. Figure 1-3 A cropped image from a slide Scan film 11
-
 1
1 -
2
-
3
-
4
-
5
-
6
-
7
-
 8
8 -
 9
9 -
 10
10 -
 11
11 -
 12
12 -
 13
13 -
 14
14 -
 15
15 -
 16
16 -
 17
17 -
 18
18 -
19
-
20
-
21
-
22
-
23
-
24
-
25
-
26
-
27
-
28
-
29
-
30
 |
 |