HP Indigo 20000 CA493-00130 Rev - Page 29
Solving the issue, Incorrect
 |
View all HP Indigo 20000 manuals
Add to My Manuals
Save this manual to your list of manuals |
Page 29 highlights
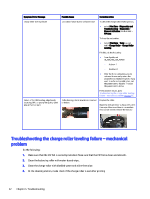
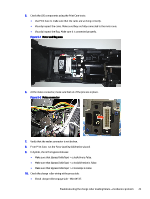
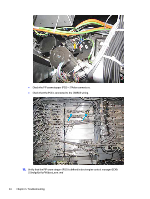
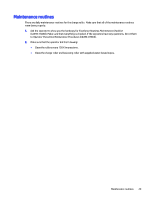
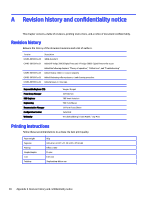
2. Open the engine rear door. 3. Check if the grounding cables are connected to the rear rail screws. If they are, go to Solving the issue on page 27. If not, the issue does not exist on the press. Figure 5-4 Incorrect Figure 5-5 Correct Solving the issue Do the following: 1. Turn off the press software. 2. Turn off the press. 3. Do the lockout/tagout procedure. 4. Open the engine front door. 5. Remove the charge roller from the engine. 6. Remove one rail screw. Apply Omnifit 50 or Loctite 222. Reinstall the screw onto the rail. Remove the other rail screw. Apply Omnifit 50 or Loctite 222. Reinstall the screw onto the rail. Solving the issue 27
-
 1
1 -
2
-
3
-
4
-
5
-
6
-
7
-
8
-
9
-
10
-
11
-
12
-
13
-
14
-
15
-
16
-
17
-
18
-
19
-
20
-
21
-
22
-
23
-
 24
24 -
 25
25 -
 26
26 -
 27
27 -
 28
28 -
 29
29 -
 30
30 -
 31
31 -
 32
32 -
 33
33
 |
 |
2.
Open the engine rear door.
3.
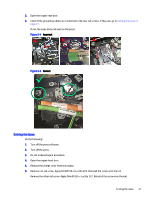
Check if the grounding cables are connected to the rear rail screws. If they are, go to
Solving the issue
on
page
27
.
If not, the issue does not exist on the press.
Figure 5-4
Incorrect
Figure 5-5
Correct
Solving the issue
Do the following:
1.
Turn off the press software.
2.
Turn off the press.
3.
Do the lockout/tagout procedure.
4.
Open the engine front door.
5.
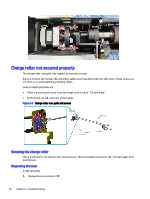
Remove the charge roller from the engine.
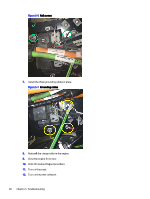
6.
Remove one rail screw. Apply Omnifit 50 or Loctite 222. Reinstall the screw onto the rail.
Remove the other rail screw. Apply Omnifit 50 or Loctite 222. Reinstall the screw onto the rail.
Solving the issue
27