HP Indigo 5000 HP DesignJet 5000 Series Printer - Setup Poster - Page 10
Hardware Setup - ink
 |
View all HP Indigo 5000 manuals
Add to My Manuals
Save this manual to your list of manuals |
Page 10 highlights
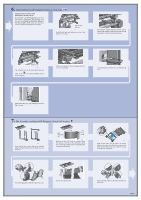
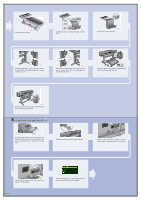
The printer trims the edge of the media and displays the above. st015 Carefully wind the excess media back onto the spindle. Use the blue removable media stop to turn the roll of media in the direction shown above. Press Enter. If you are performing the printer setup for the first time, the printer will now start the printhead alignment routine. The front panel displays the above. INK STARTUP Printer startup has finished. Press ENTER to continue When the printhead alignment has finished, the front panel displays the above. Press Enter. 13. Hardware Setup Printer PC, Macintosh, or workstation Printer Network Server PC, Macintosh, or workstation Your printer can be connected to a computer directly by a parallel cable or to a computer via a network connection. st565a If you are using a direct connection to the computer, connect the parallel cable to the printer as shown. Direct Connect: Go to the next page and perform the procedures for installing the software. Network Connect Go to the next page and perform the procedures for setting up your printer on the network and installing the software. To obtain useful information before setting up your printer on the network: n Go to the Setup menu in the printer's front panel. n Select I/O Setup and press Enter. n Select Card ID and press Enter. Write down the hardware and IP addresses: (ETHER=xxxxxxxxxxxx and IP=nnn.nnn.nnn.nnn). Macintosh users should also write down the Appletalk name (AT=xxxx...). For HP DesignJet WebAccess users: To use the HP DesignJet WebAccess feature, you will need to configure your printer on an IP network. If you have a PC running Windows, use the HP DesignJet Printers Software Setup CD (see the next page). Otherwise see the JetDirect Administrator's Guide. st565 If you are using a network connection, connect a network cable to the JetDirect Card at the rear of the printer. Page 10
-
 1
1 -
2
-
3
-
4
-
 5
5 -
 6
6 -
 7
7 -
 8
8 -
 9
9 -
 10
10 -
 11
11 -
 12
12
 |
 |
