HP Indigo 5000 HP DesignJet 5000 Series Printer - Setup Poster - Page 7
Ink System Startup, Installing the Printhead and Printhead Cleaner - problems
 |
View all HP Indigo 5000 manuals
Add to My Manuals
Save this manual to your list of manuals |
Page 7 highlights
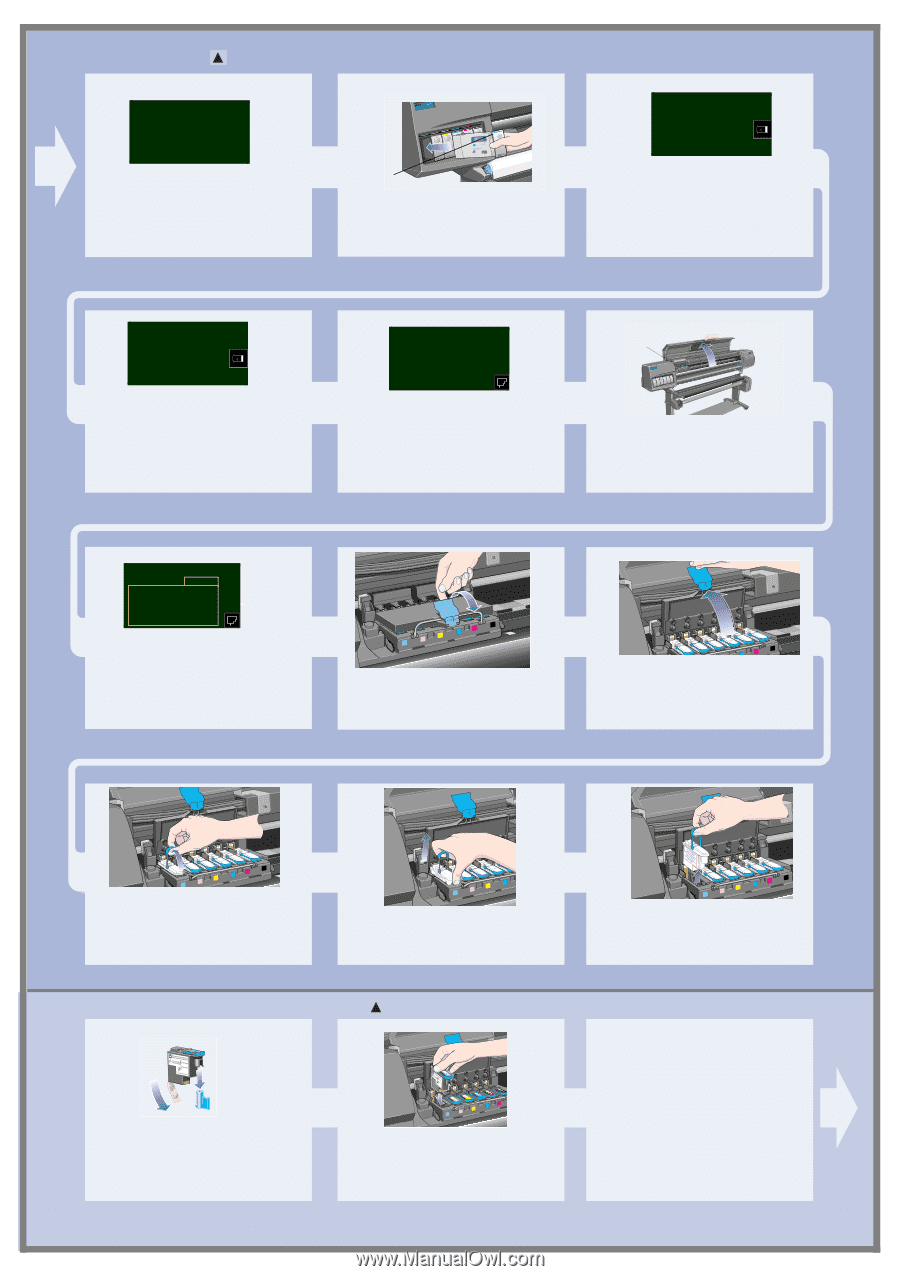
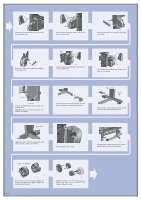
9. Ink System Startup INK STARTUP Printer startup. Press ENTER to continue The front panel displays the above. Press ENTER. Colored label st054 at the top of the Ink Cartridge Slide all of the ink cartridges into their slots. INK CART. ACCESS HP ink cartridges successfully installed Press ENTER to continue When all SIX ink cartridges have been installed correctly, the front panel will display the above. INK STARTUP Initializing printer Please wait xx sec Press ENTER. The front panel displays the above. INK STARTUP Lift window to replace SETUP printheads When the printer has primed the ink system, the front panel displays the above message. Carriage Assembly st056a Open the window and locate the printhead carriage. Insert printheads REPLACE (XX04) REPLACE (XX04) REPLACE (XX04) REPLACE (XX04) REPLACE (XX04) REPLACE (XX04) Printhead The front panel will display the above message. st057 Pull up and release the latch on top of the Carriage Assembly. st092 Lift up the cover. This will now give you access to the setup printheads. st093 To remove the setup printhead, lift up the blue handle. Place your index finger through the loop of the blue handle. 10. Installing the Printhead and Printhead Cleaner st062 Remove the blue protective cap and the clear protective tape from the printhead's nozzles. st063 Push down in the direction indicated by the arrow shown above. When all the printheads are inserted correctly and accepted by the printer, the printer will "BEEP". st095 Pull the handle upwards until the setup printhead is released from the Carriage Assembly. Make sure that you remove and discard all six setup printheads. If the printer does not "BEEP" when you insert the last printhead and "Reseat" is displayed on the front panel, try re-seating the printhead more firmly. If the problem persists, refer to the Using Your Printer CD. Page 7
-
 1
1 -
 2
2 -
 3
3 -
 4
4 -
 5
5 -
 6
6 -
 7
7 -
 8
8 -
 9
9 -
 10
10 -
 11
11 -
 12
12
 |
 |